
Thomas Tilley
[ Home ] [ Publications ] [ Resume ] [ Family ] [ Projects ] [ The Others ] [ Sitemap ]
[ Home ] [ Publications ] [ Resume ] [ Family ] [ Projects ] [ The Others ] [ Sitemap ]
 | |
 | |
 | |
 | |
 | |
 | |
 |
 What can't you do with PVC
(Polyvinyl
Chloride) pipe? The ubiquitous blue PVC water pipe can be seen
along most streets here and appears to be one of Thailand's most
abundant un-natural resources. A wide variety of different connectors are available
and apart from carrying water it is also used as a cheap construction
material that can be used to make everything from clothes dryers to Wheel chairs (PDF), Crutches, flagpoles and shop signs.
What can't you do with PVC
(Polyvinyl
Chloride) pipe? The ubiquitous blue PVC water pipe can be seen
along most streets here and appears to be one of Thailand's most
abundant un-natural resources. A wide variety of different connectors are available
and apart from carrying water it is also used as a cheap construction
material that can be used to make everything from clothes dryers to Wheel chairs (PDF), Crutches, flagpoles and shop signs.
Of course on the Internet you can also find some other very cool and creative things made from (non-blue) PVC pipe including: Halloween costumes like Ben Hallert's Matrix APU and Aliens Exo-skeleton Power Loader, another power loader costume, single and multi-guitar Guitar Hero stands, a laptop stand, flutes, and even a shaving stand.
Below you will find, in chronological order, some of my own (mostly original) creations made from PVC water pipe including:
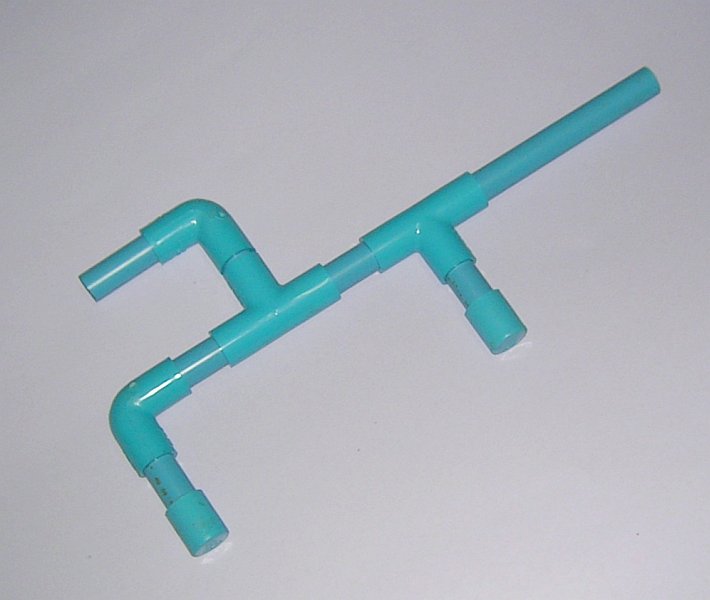
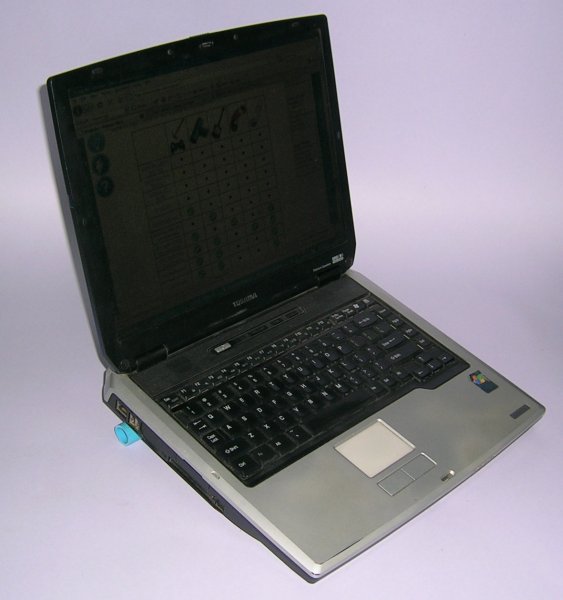
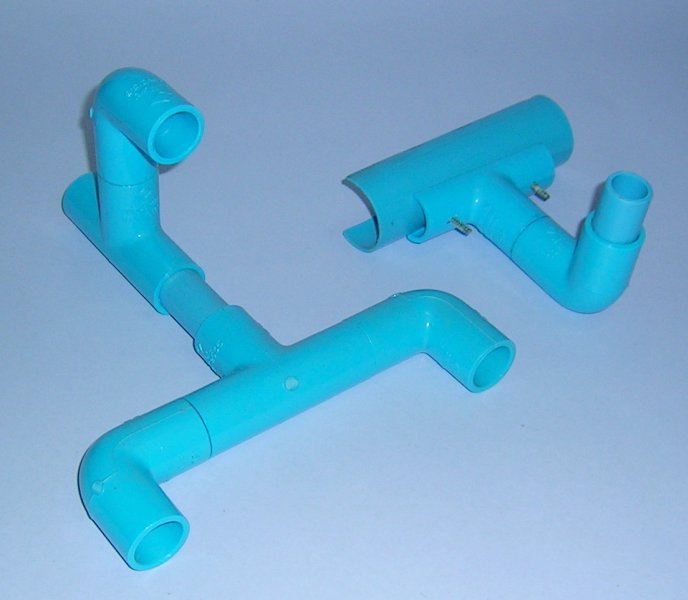
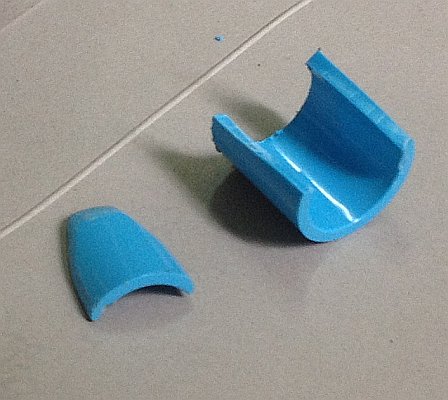
This was the project that started my love affair with blue PVC pipe. I had seen the blueprints for this marshmallow shooter while I was in Australia but the fittings were prohibitively expensive (see the image right). Fortunately they are very affordable here in Thailand. The shooter is constructed from approximately 60cm (2') of 18mm (1/2") pipe, 2 x T-pieces, 2 x elbows, 2 x end caps.
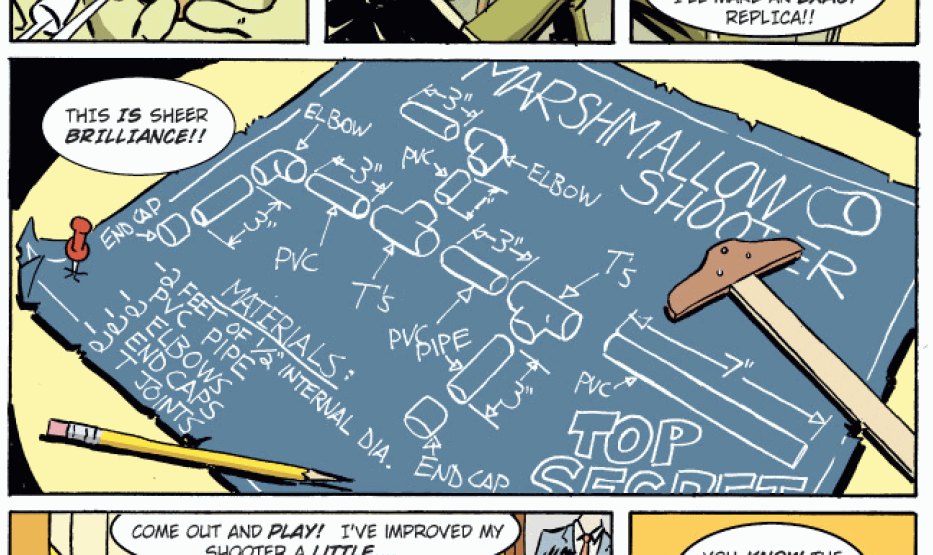 Source: HOWTOONS |
Unfortunately there are no mini- marshmallows here in Thailand and hence no ammunition! We brought two bags with us which were exhausted all too soon and the guns have since remained silent (although we haven't yet tried to beat them into PVC ploughshares).

Fortunately in Thailand there is a drink called "cha muk" or "pearl milk tea" - I think it's known as bubble tea in other countries. Cha muk comes in a variety of flavours, it's served with a straw that is about 1cm in diameter, and it contains black tapioca balls (pearls).
Invariably when you get to the end of your drink
you have a supply of pearls left over and my son and I discovered that
the straws make wonderful pearl shooters. Using the same blow-gun
principle as the marshmallow shooter, you can shoot tapioca pearls at
each other and there's no denying a hit because they stick in a way
that would make you think they were made from velcro. Not only is
this useful as evidence but you can also pull them off and use them to
re-load in the midst of battle!
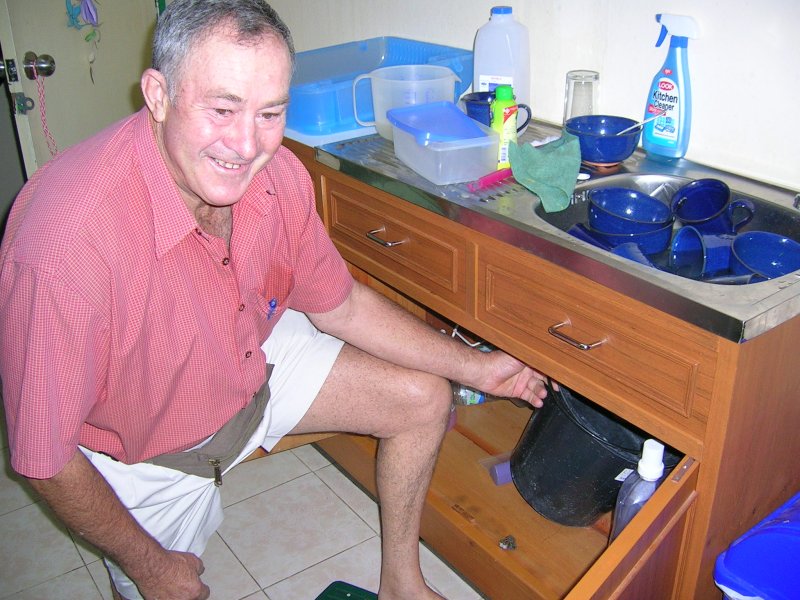
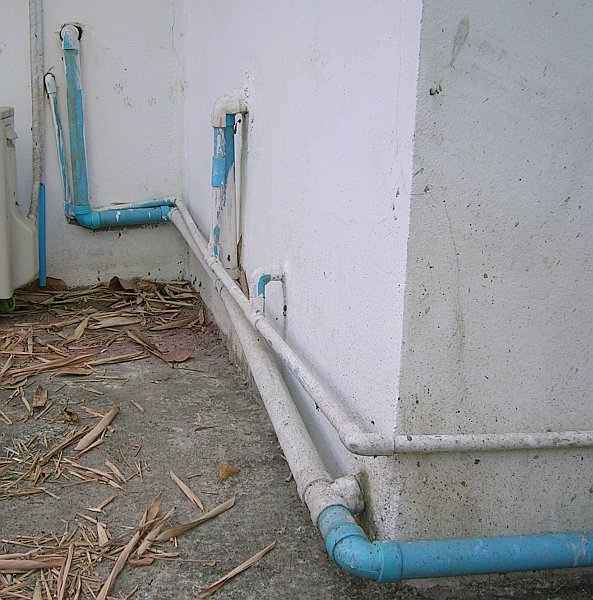
This is perhaps the most obvious use for PVC water pipe - plumbing! When you rent a house in Thailand, often it doesn't even come with the kitchen sink. When we moved in my wife decided where she wanted the sink to go and armed with my new found PVC pipe skills that I acquired making the marshmallow shooter I plumbed water to the tap.
I was a little reluctant to go smacking holes in the wall to find a drainage pipe so for a number of months we kept a bucket under the sink. My father had no such qualms, however, and when they came to visit he plumbed the drainage for us.
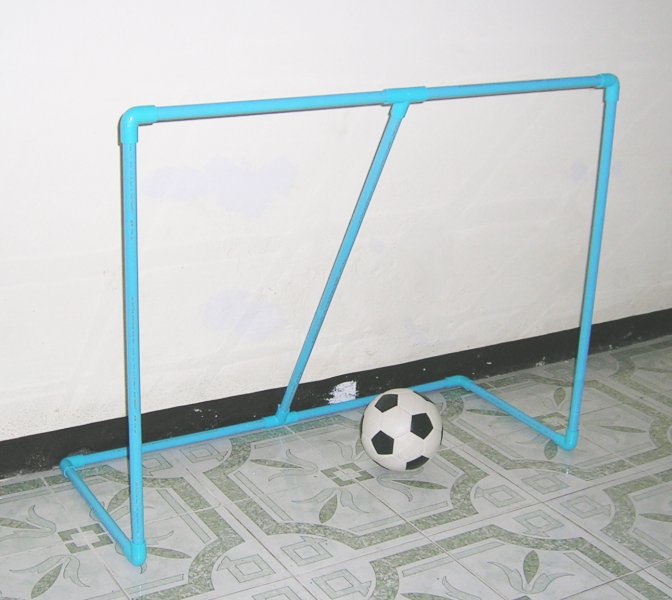
I made a matching pair of these indoor soccer goals for my son using some 18mm (1/2") pipe, 2 x T-Pieces and 6 x elbows.

Cricket (not to be confused with Brockian Ultra-Cricket) is Australia's national sport played with a bat, a ball, and two wickets. This is a PVC wicket I made for Australia Day 2007 using some 25mm (1") pipe, 6 x T-pieces, and 2 x elbows. Some people would consider using a wicket like this to be cheating because the bails (two horizontal pieces that balance on top of the three upright stumps) are glued on!
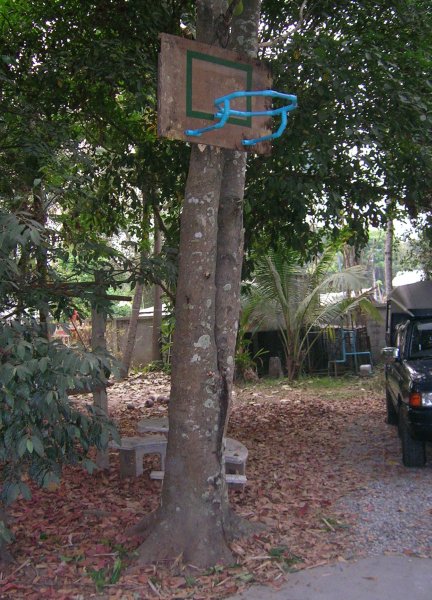
Continuing with the sports theme, this is a basketball hoop I made so that my son could practise Basketball. I found some dimensions on the Internet and made the ring using 18mm (1/2") pipe, 6 x T-pieces, and 12 x 45-degree elbows. The backboard is a non-regulation size piece of plywood that we found lying around and we used green duct tape for the markings.
Although the ring isn't strong enough to hang off, the side supports make it robust enough for normal play. They also give it a very Star Trek feel and I think the ring looks not unlike the NCC-31911 Saratoga.
 |
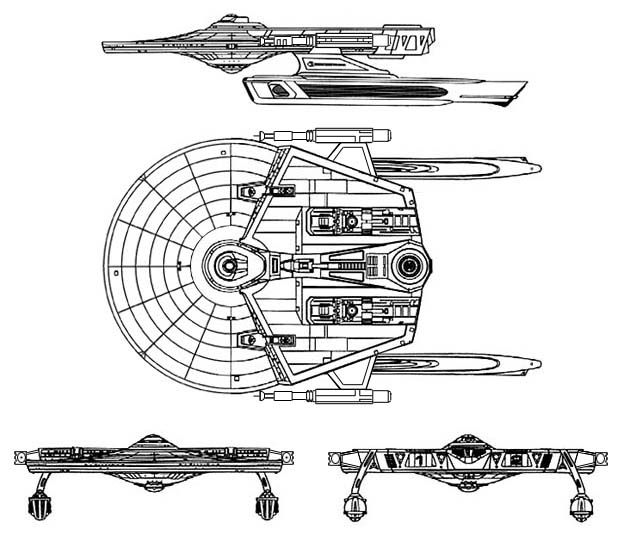 Source: ShipSchematics |
 |
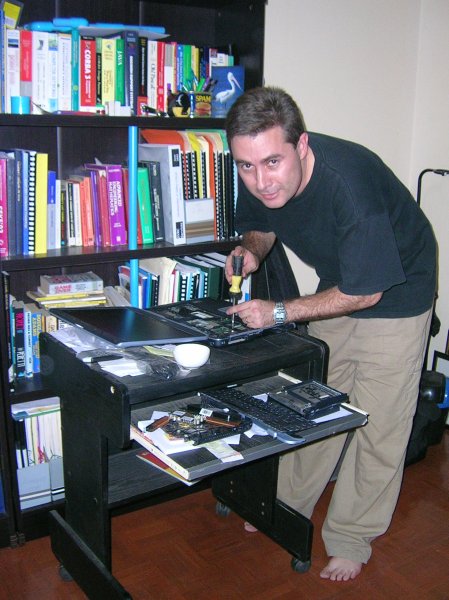
This is perhaps the most straight forward use for PVC pipe on this page. I made some shelf supports for the Computer Science section of our home library using some 20mm (3/4") pipe, 0 x T-pieces, 0 x elbows, and 0 x end caps.
There is an "Easter egg" in the full-size image - one of our marshmallow shooters can be seen on the top shelf.

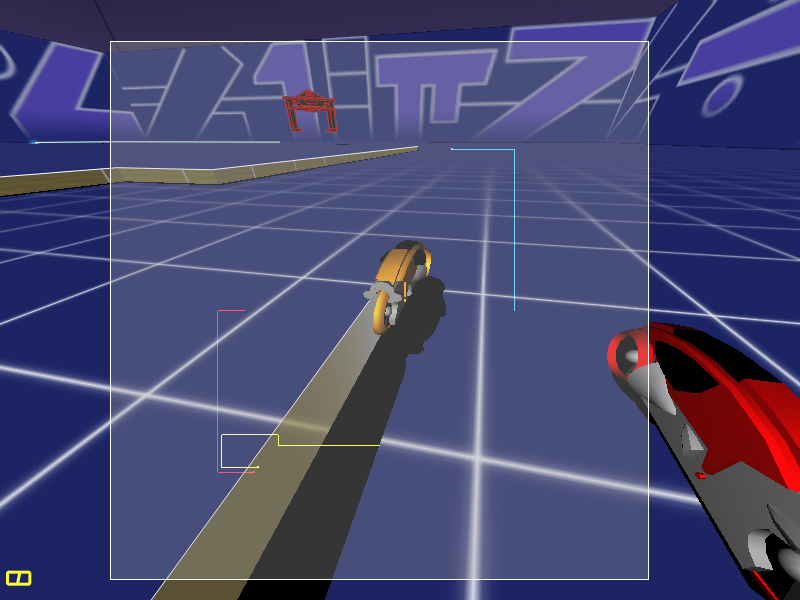
I've always been a fan of the movie Tron and this is a controller I made out of PVC pipe to play the lightcycle racing game GL-Tron. The controller is made from 3 sections of 18mm (1/2") pipe, 2 x 25mm to 18mm (1" to 1/2") reducers, 2 x custom motorbike hand-grips, 4 x push-buttons, and a mercury switch which are connected to a computer via a hacked USB joystick.
You can find more details about how I made the controller on this project page and I've also extended the same idea to play GL-Tron using real motorbikes.
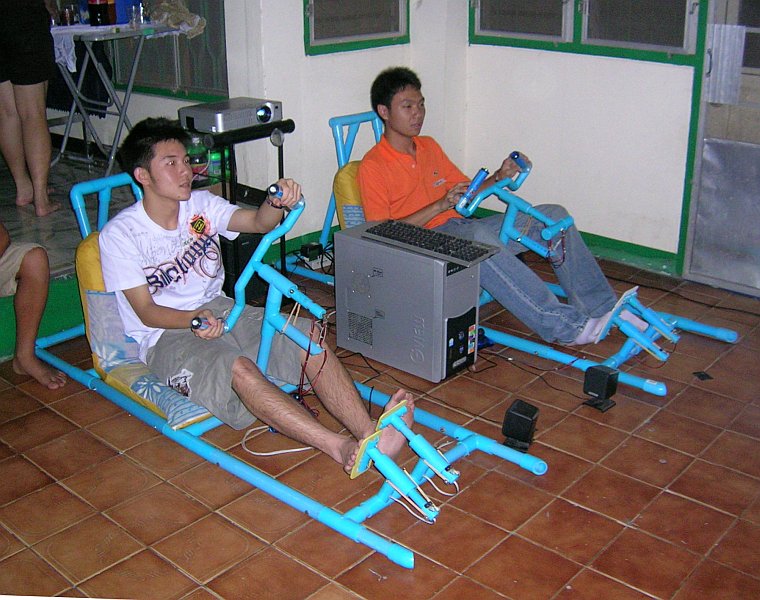
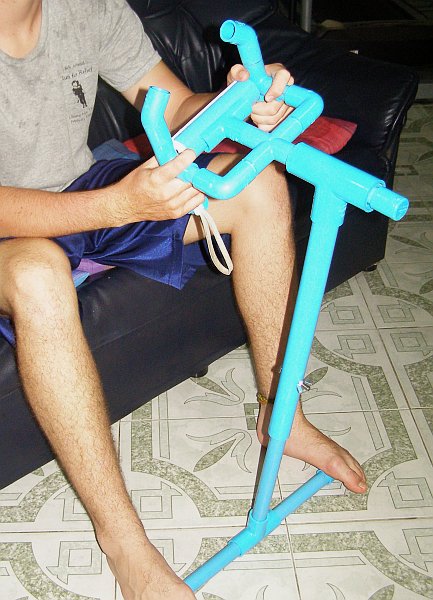
A university student who played with the PVC Water Pipe Tron Controller, described above, said "That's OK but I like to play driving games". It got me thinking and over the next week I spent my evenings building a PVC racing car controller - essentially a wheel-less, PVC go-kart frame connected to the computer via a hacked USB joystick.
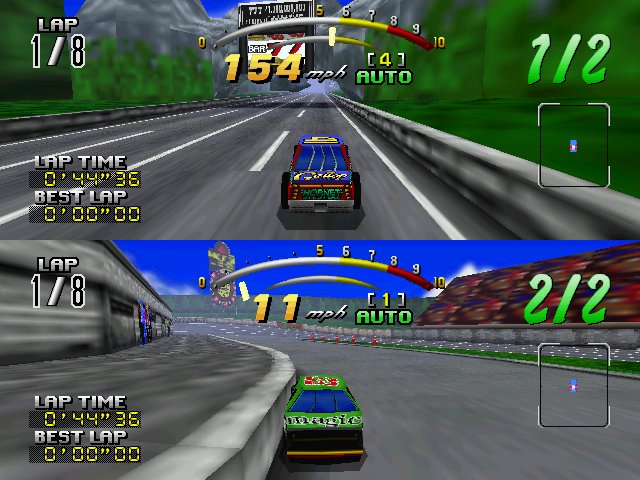
Some Thai university students who saw the first car wanted to know how it all worked and six of them came around one Saturday and we spent the whole day hacking joysticks and building a second car. By connecting them both to a laptop and a data projector we were able to play split-screen Daytona USA.
You can find more details about the design and construction of the cars on this project page.
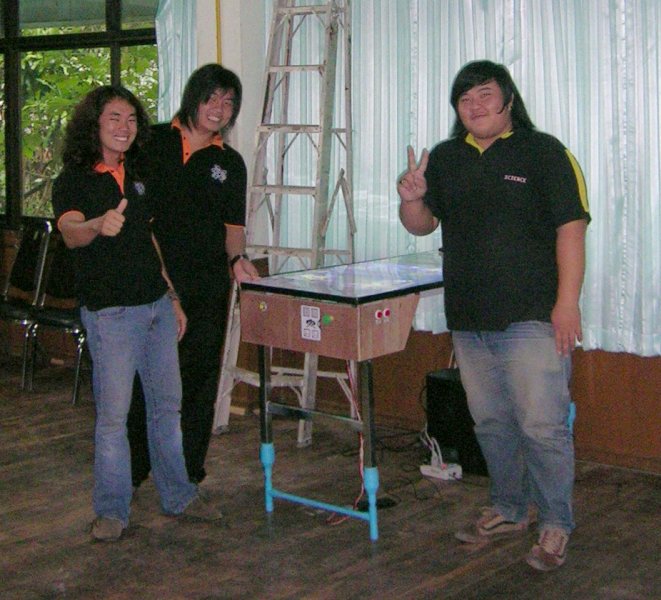
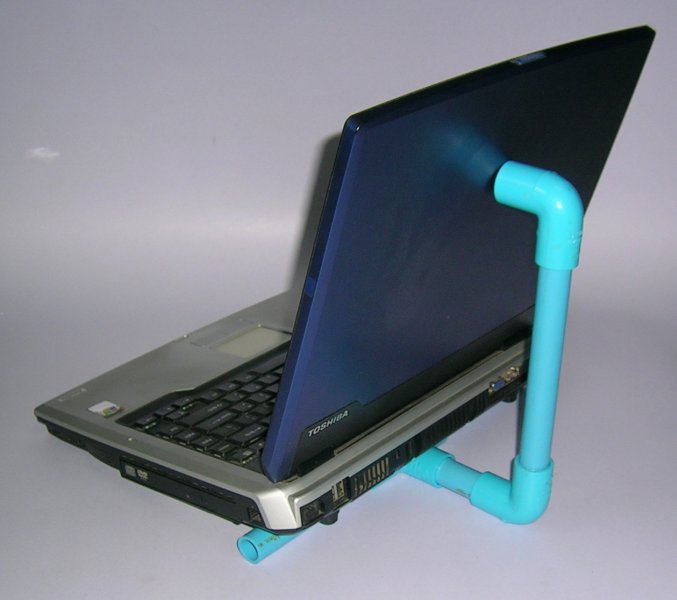
The white office table I used for the virtual pinball machine wasn't high enough to be played comfortably. Originally, I used some bricks to raise the table the more pinball-like height of 90cm (35") but then I decided that some PVC leg extensions would be somewhat more portable.
Extensions for each end of the table were constructed using 18mm (1/2") pipe, 2 x T-Pieces, 2 x end caps, 2 x 40mm to 18mm (1 & 1/2" to 1/2") reducers and 2 x short lengths of 40mm (1 & 1/2") pipe. The horizontal bars aren't glued so the extensions can be fitted to tables with different dimensions by simply cutting some more 18mm pipe to the appropriate length.
If you look carefully you can see the legs in action around the 37 second mark in video:
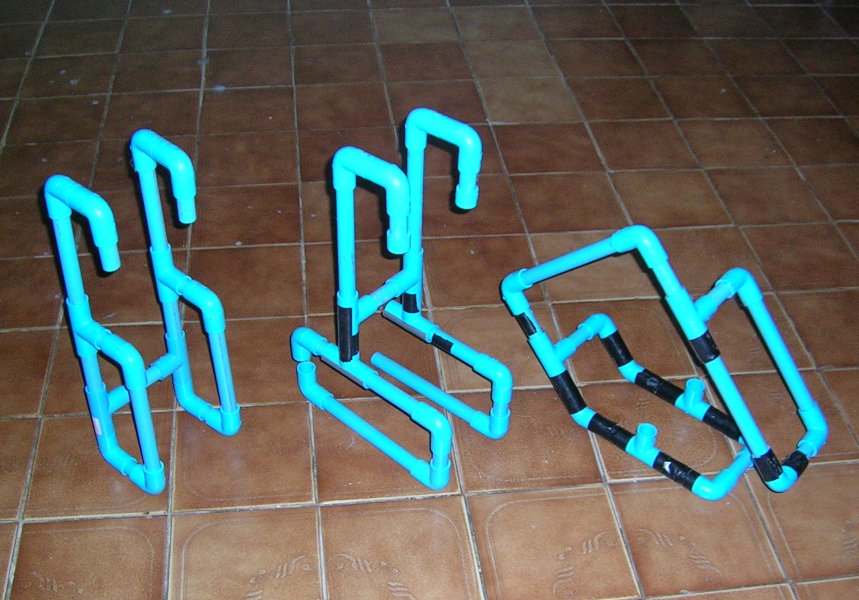
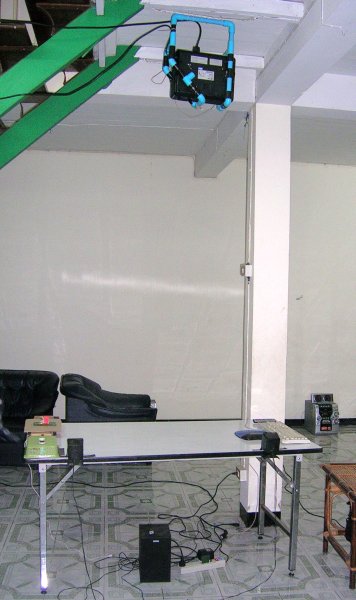
Both the virtual pinball table and the Plasma Pong table require vertically mounted data projectors. The virtual pinball table has made appearances at six different venues and as a result I now have a growing collection of PVC cages used to suspend a number of different projectors beneath stairs, air-conditioners and various ceilings.
Data projectors are expensive and nothing dampens a good game of pinball more than a data projector unexpectedly crashing on to the table (especially if it's not yours!). Make sure everything is glued securely and use liberal amounts of duct tape and cable-ties for backup. Be careful not to obstruct air inlets/outlets and if you are borrowing a friends projector make sure you let them know what you intend doing with it first!

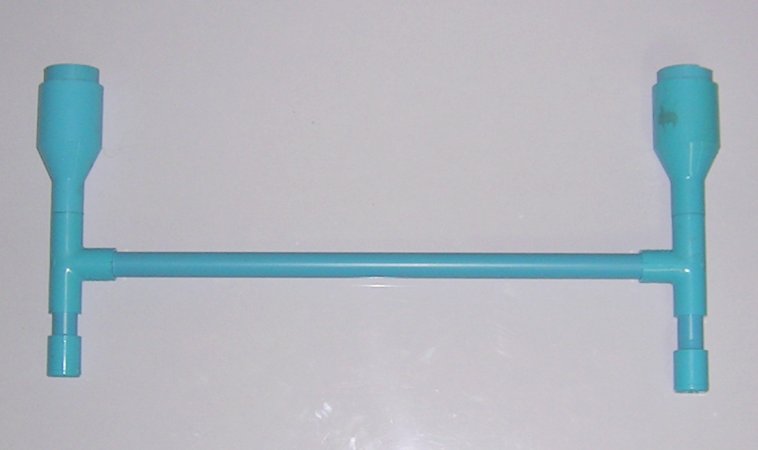
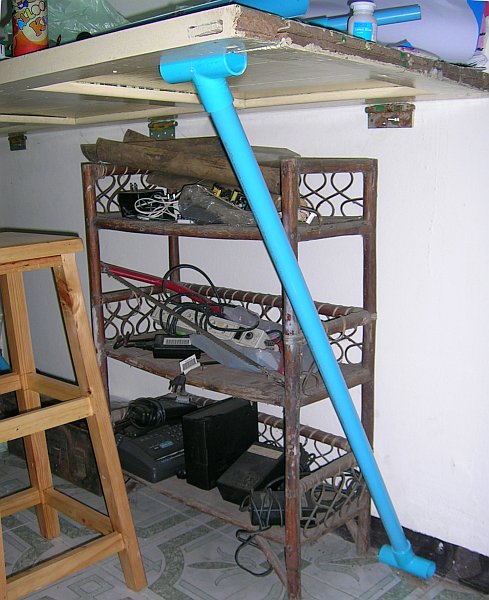
As straightforward as this stand looks, the "L"-shaped upright section is actually part of an air-conditioner mount for a data projector that I made for one of the virtual pinball table installations. The T-piece isn't glued and so in a small way (a very, very small way) I like to think that if the air-conditioning mount were ever needed again then the parts could re-combine in a Voltron or Captain Planet and the Planeteers or Power Rangers MegaZord-like way. Of course if that happened my laptop screen would fall down.
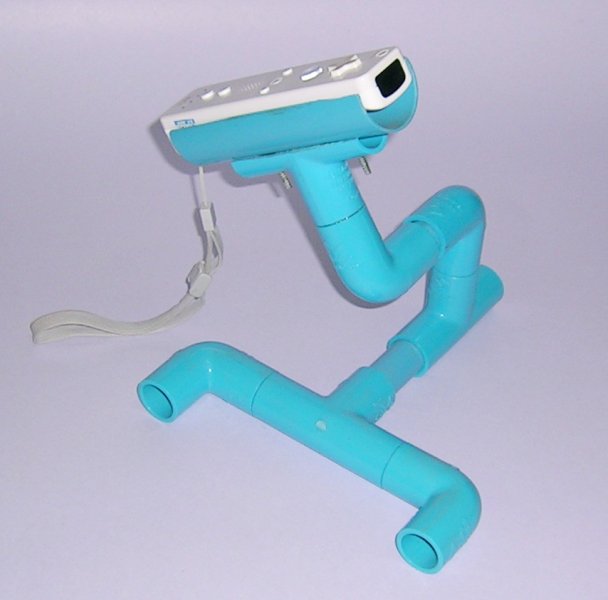
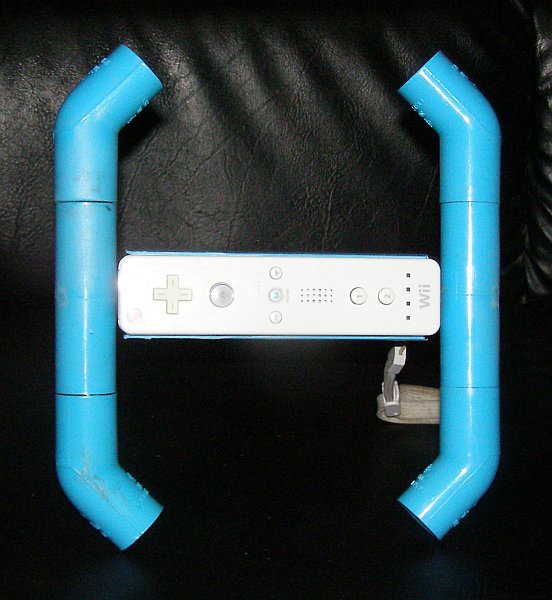
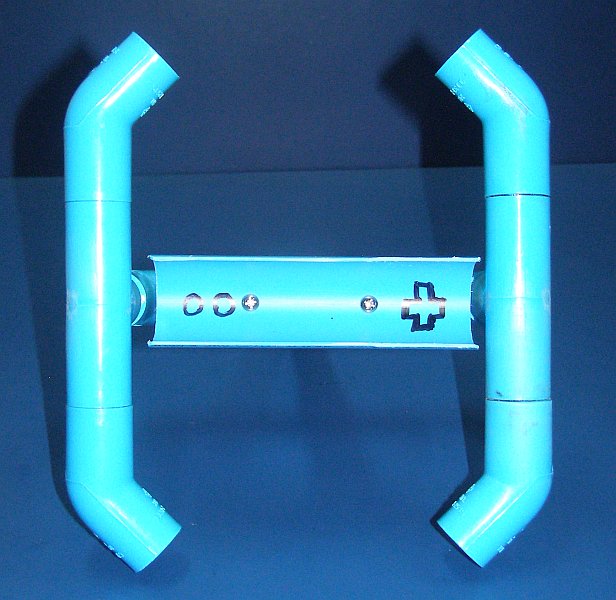
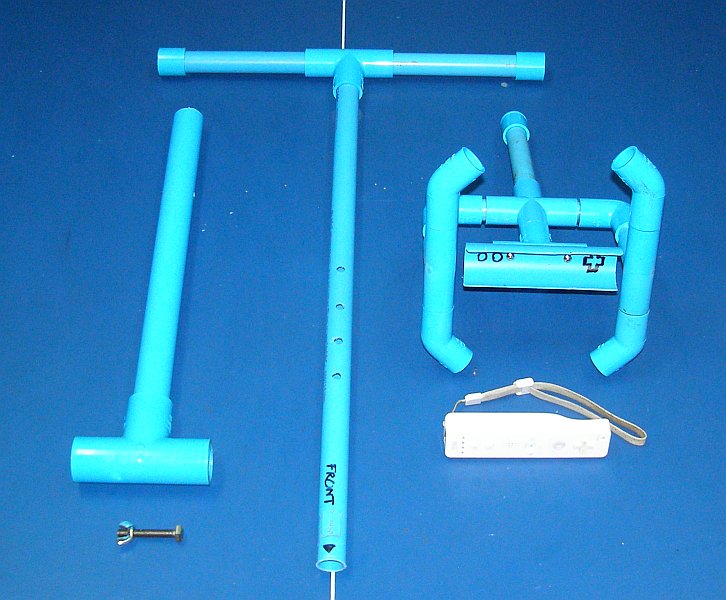
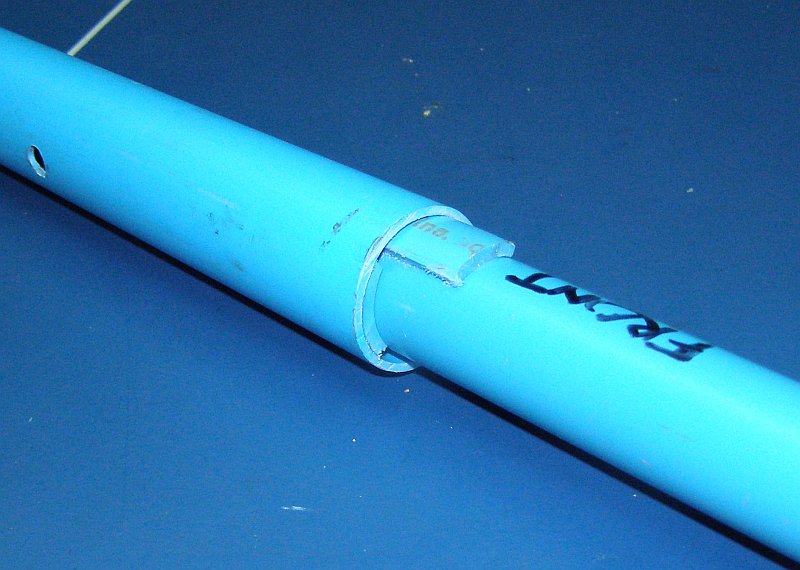
I don't own a Nintendo Wii but I did manage to get my hands on a Wiimote so that I could try out some of Johnny Chung Lee's cool projects. This is a Wiimote mount I built using a length of 35mm (1 and 1/4") pipe, some 18mm (1/2") pipe, 3 x T-pieces, and 4 x elbows.
The 35mm pipe has been cut so that it fits nicely into the
ridges down the side of the Wiimote which holds it securely. This is
screwed onto a T-Piece which has also had its top cut off. The joint
between the two topmost elbows is not glued so the angle of the top
section can be adjusted.
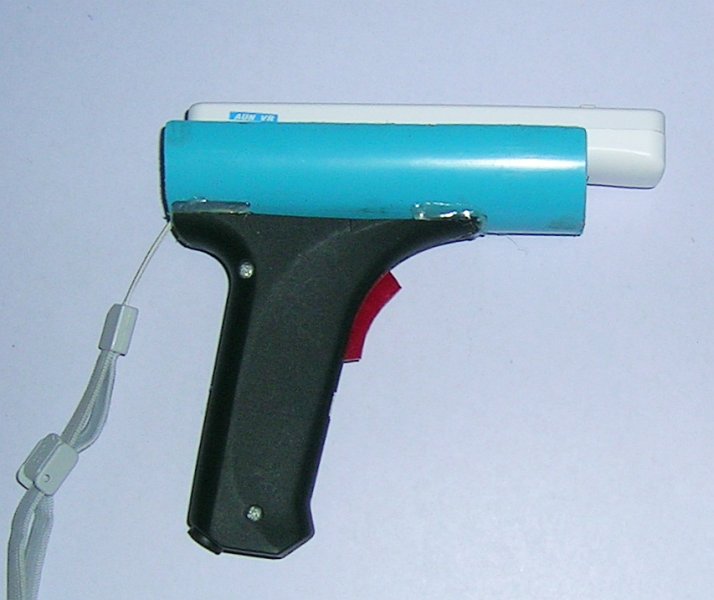
This is yet another DIY Wii Zapper that I built using some 35mm (1 and 1/4") pipe, some acrylic, a cable tie, and a broken hot-melt glue-gun. While perhaps not as cool as a cereal box, Lego, MP5, or AK47 Wii Zapper, it gets the job done.
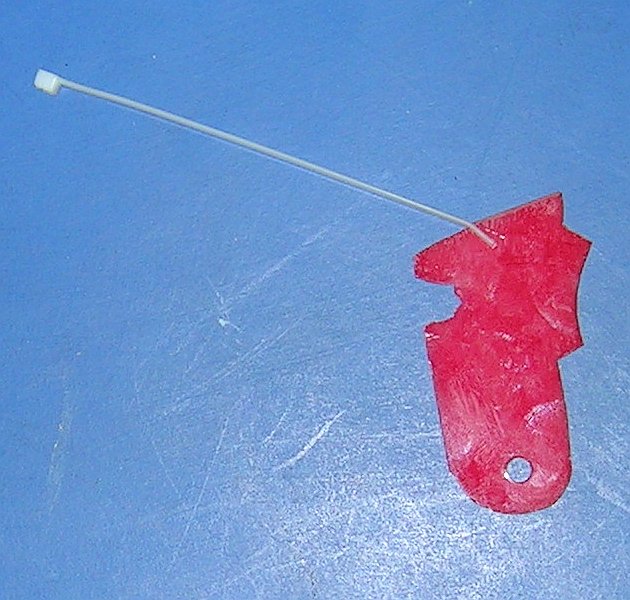
The original trigger mechanism in the broken hot-melt glue-gun is designed to feed glue forward but I needed a mechanism that would pull back on the "B" button underneath the Wiimote. I cut the handle off of the old glue-gun and made a custom red acrylic trigger that used the original pivot point and had a slot in the top for a cable tie.
The cable tie feeds through a slot in the bottom of the 35mm pipe which has been cut in the same manner as the Wiimote Holder described above. The cable tie lies beneath the Wiimote and when the trigger is squeezed it pulls back on the "B" button. Two small pieces of PVC glued at the back of the pipe stop the Wiimote from sliding backwards and a another small piece glued beneath the "B" button keeps the cable tie at the correct height. A second (working) glue-gun was used to glue the handle to the bottom of the pipe.


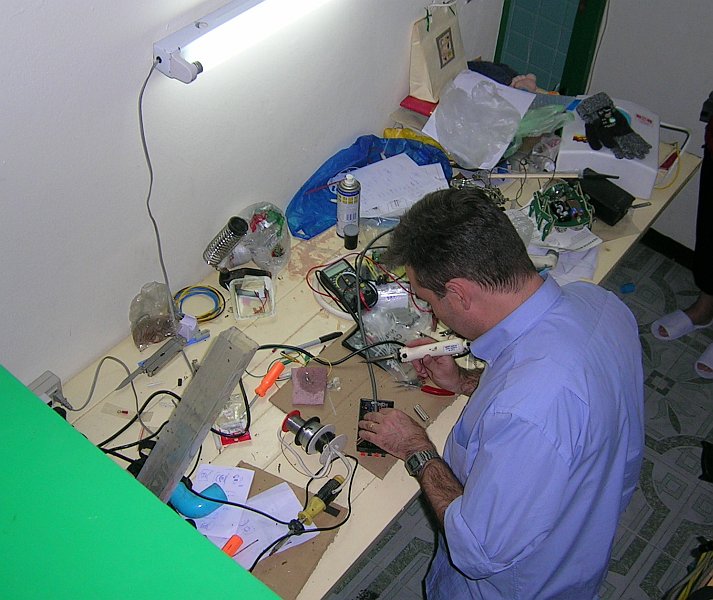
It's not as cool
as this
PVC workbench but my workbench is made from a door which has been
bolted to the wall (as all doors are but in a horizontal rather than
the normal vertical fashion) with legs made from 25mm (1") pipe
and T-pieces. The workbench height is 105 cm (3'6") and there is
another "Easter egg" in the left image - the PVC visible on the bench
is actually the barrel of a marshmallow
shooter.
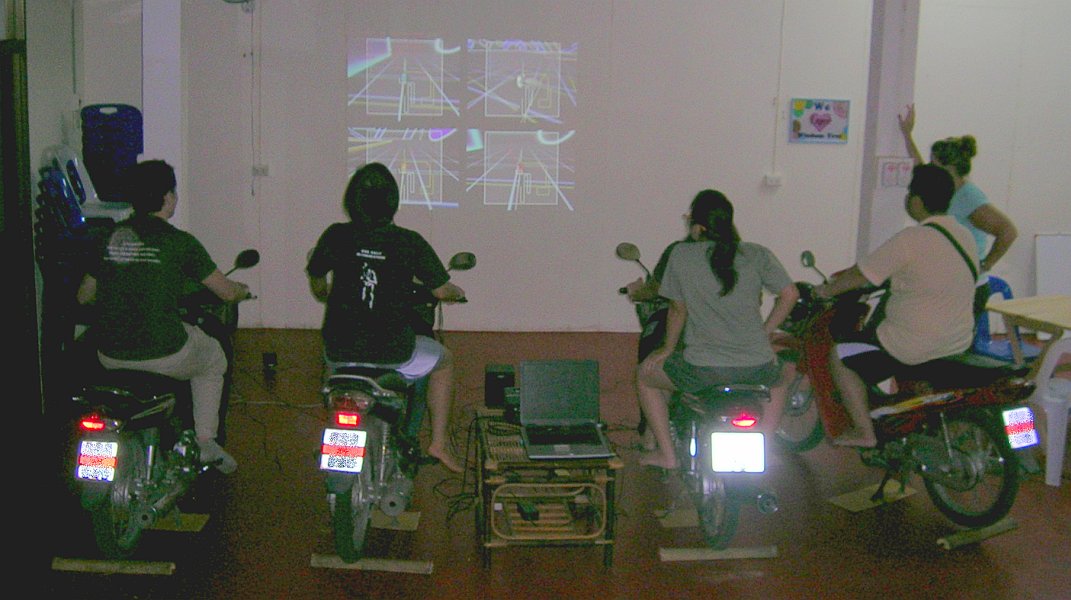
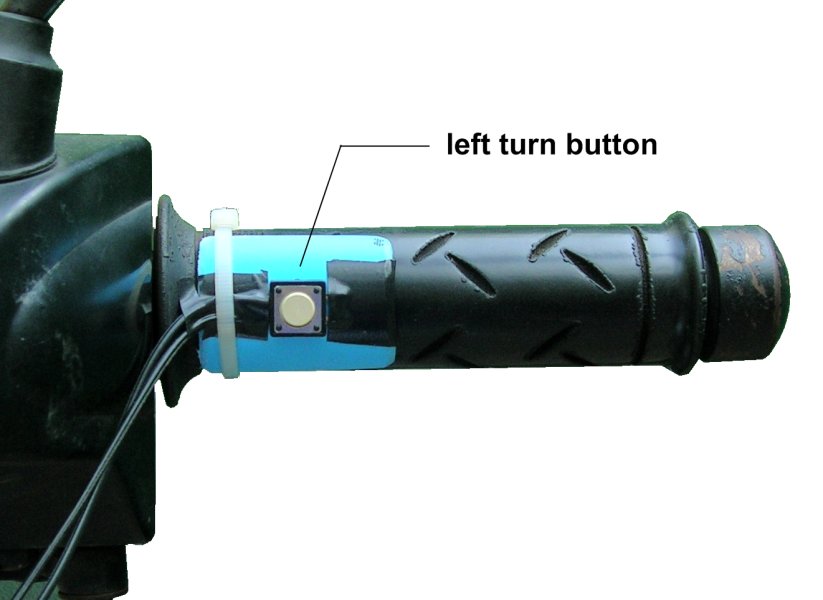
This is an extension/variation of the PVC water pipe Tron controller described above that allows up to four people to play GL-Tron using real motorbikes. The bikes are connected to the game using TACT switches mounted on sections of 25mm (1") pipe for the turn buttons. These sections are simply cable-tied onto the front of the motorbike handlebars and the players squeeze the buttons with their index fingers to turn left or right. A mercury switch is also mounted on the right handlebar so the accelerator can be used to provide boost within the game and up to four bikes can be connected to the computer via a single hacked USB joystick.

The centerstands keep the bikes upright during play and a half-round of bamboo is wedged underneath the back tires to stop them from rocking. You can find more details about the bikes on this project page and you can see them in action here:
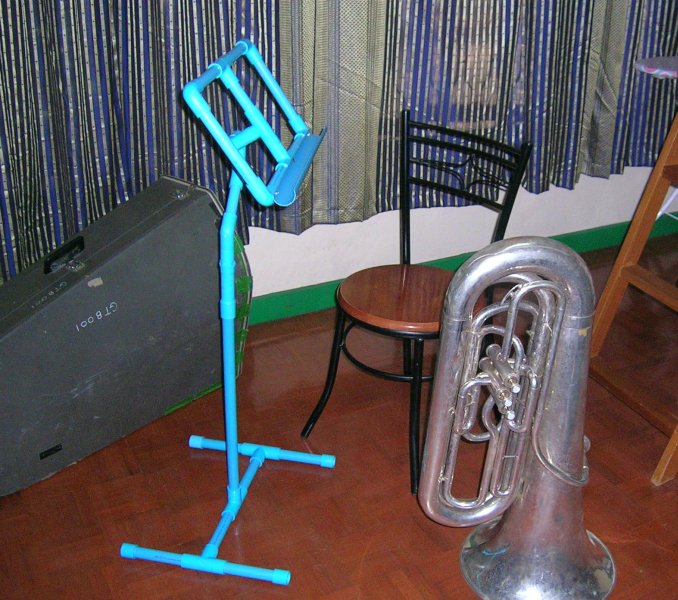
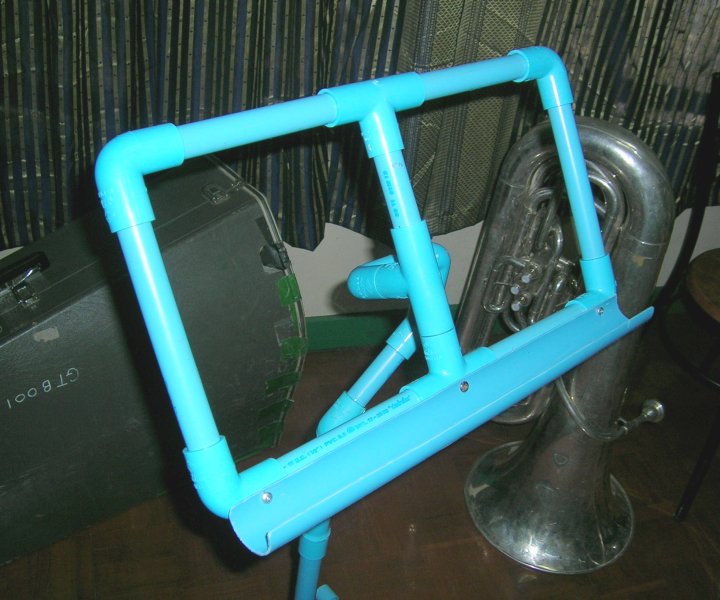
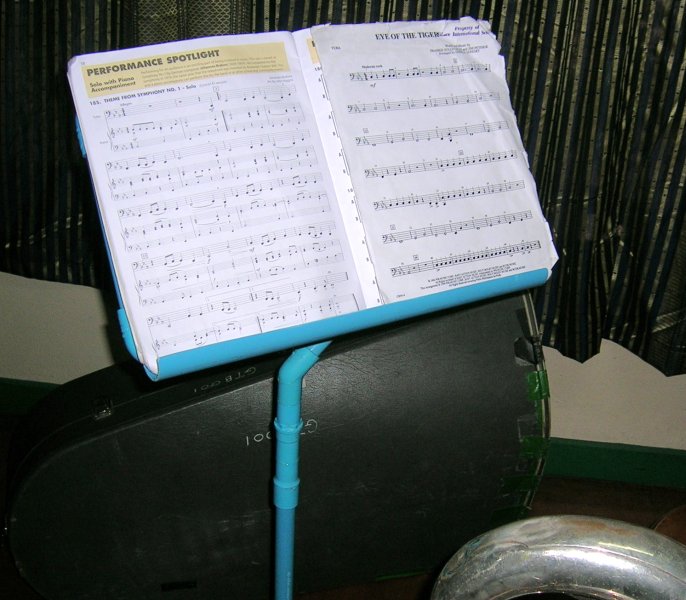
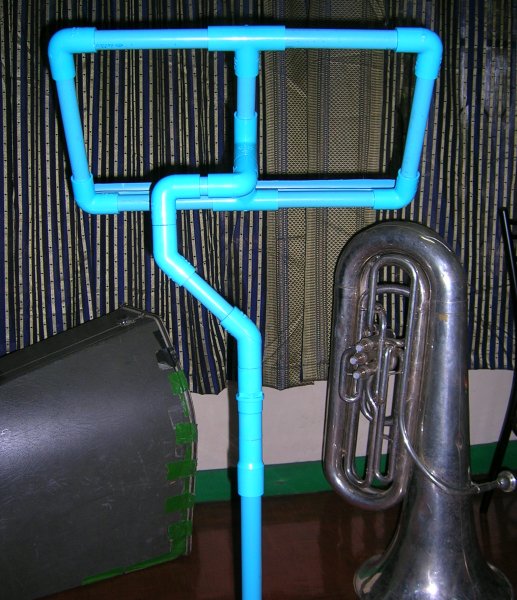
This is a music stand made from three different sizes of pipe. The top section is made from one 43cm (17") length of 35mm (1 and 1/4") pipe which is cut in half to hold the base of the music. This is attached using 3 screws to the rest of the top which is made from 18mm (1/2") pipe, 3 x T-Pieces, 6 x elbows, 2 x 45-degree elbows, and 1 x male threaded connector. The joint between the two topmost elbows behind the music is not glued so that the angle of the music can be adjusted and the threaded connector allows the base to be removed for storage.
The base is made from 20mm (3/4") pipe, 3 x T-pieces and 4 x connector off-cuts (to stabilise the end of each leg), 1 x 20mm to 18mm (3/4" to 1/2") reducer, and 1 x 18mm female threaded connector. Since making the stand I've thought of a number of possible improvements on the design including height adjustment but overall I'm pleased with how this first version came out.
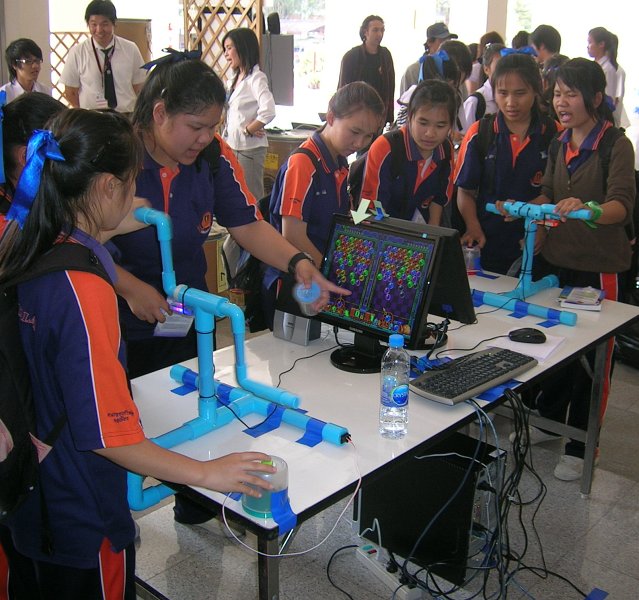
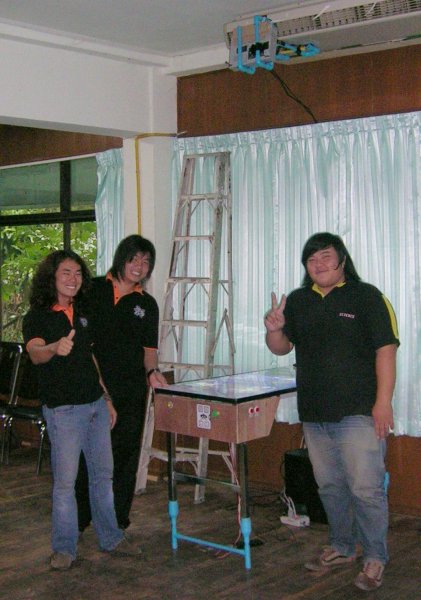
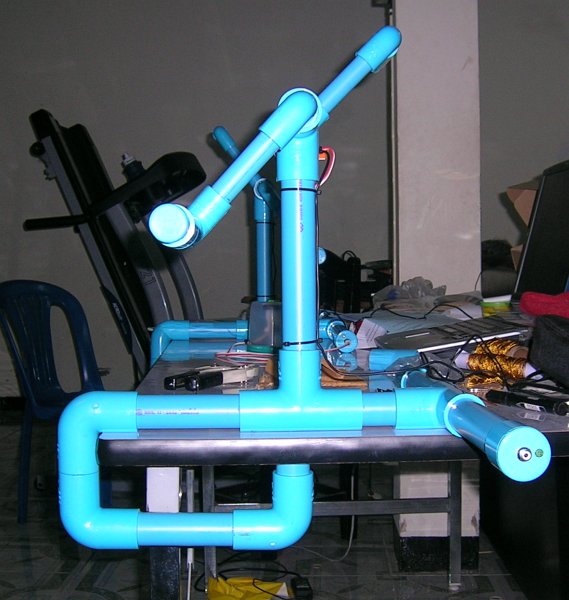
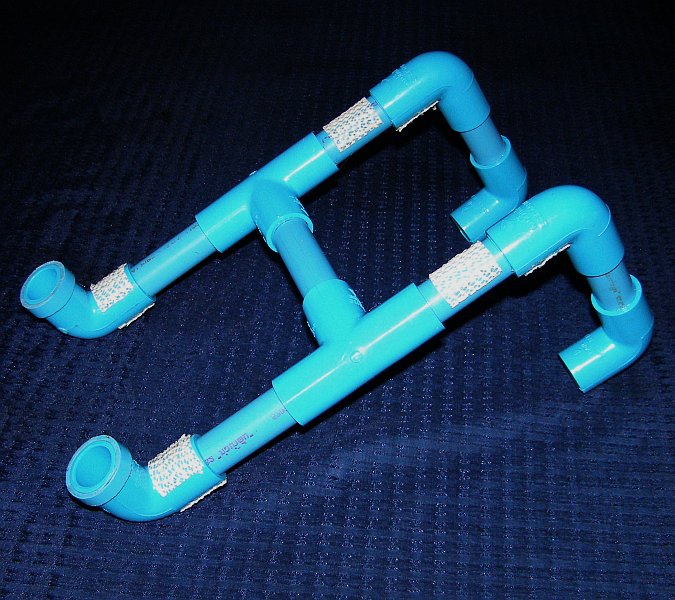
The Dean of Science asked if I could make something fun for visitors to play with at Payap University's 35th Anniversary celebrations. I had been wanting to make some controllers to play the 1994 arcade game Puzzle Bobble (also known as Bust-a-Move) that worked like the coffee-grinder/pedestal winches that racing yachts use (see the image below) - so this was the perfect opportunity.
The pedestal was made from 25mm (1") pipe using 2 x T-Pieces, 3 x elbows and 2 x end caps, with the elbows forming a simple G-clamp to hold it to the table (the connection at the tables edge is not glued so that it can be easily removed). The crank is made from 18mm (1/2") pipe using 4 x elbows, and 2 x end caps, with 2 x 20mm (3/4") joiners for the hand-grips which can rotate freely.
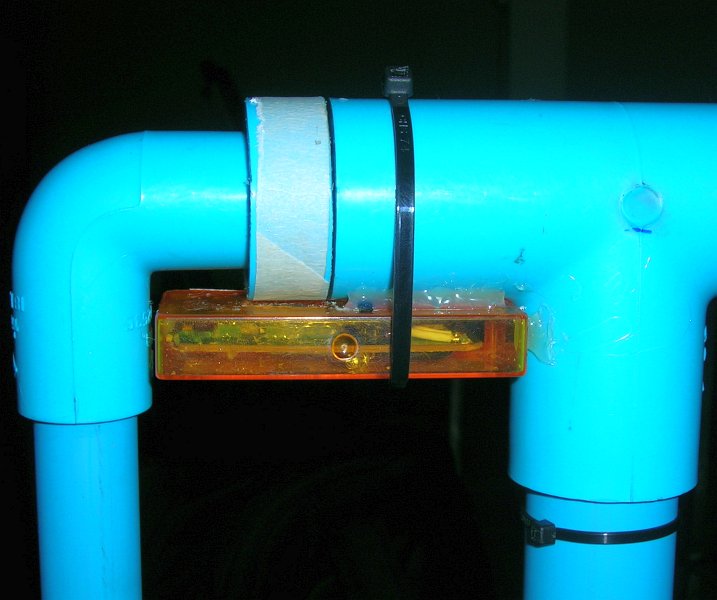
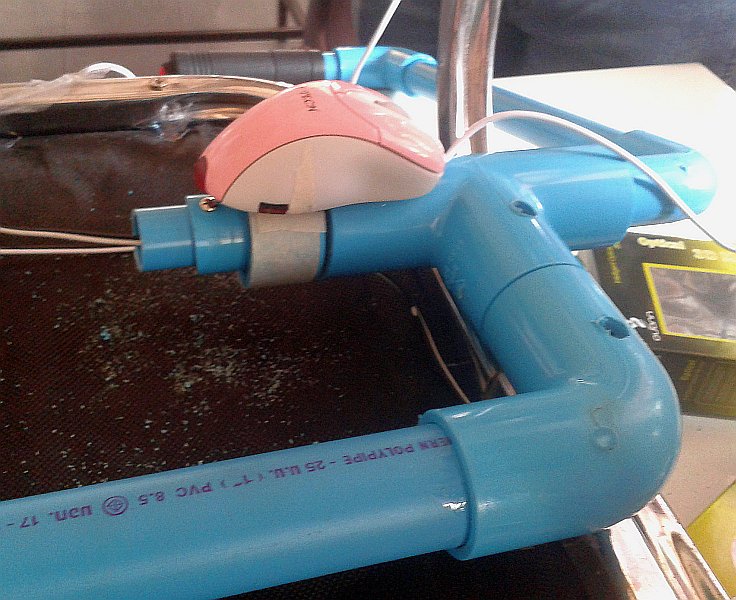
A stripped down optical mouse, housed in a Clorets container (see the orange plastic box below), acts as a rotation sensor and an arcade-style button is wired as the left mouse button. As you rotate the crank a monster in the game turns a wheel to aim the bubble gun. Pressing the button launches the bubble and if three or more of the same colour connect then they pop and disappear. It's a lot of fun, especially playing against someone else.
 |
 Source: Latitude 38 |
 |
 |
You can see the controllers in action below and you will find construction details and more information on how it works here.
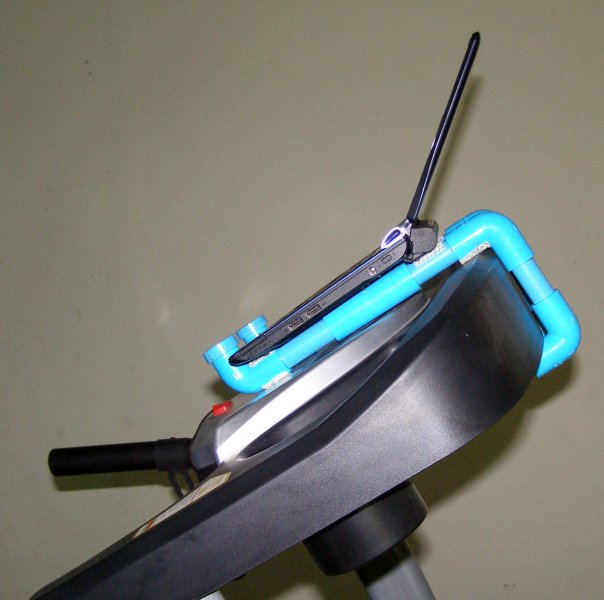
 Being an IT-kind-of-a-guy I've never really been into fitness
but more recently I have started to take my health more seriously.
Now walking or running on a treadmill is great but the physical
benefits need to be traded off against the time it takes - time that
could be spent doing something else like surfing the web, or watching
a movie. Well not anymore! Now you can exercise and be a geek at the
same time with the amazing netbook treadmill hook!
Being an IT-kind-of-a-guy I've never really been into fitness
but more recently I have started to take my health more seriously.
Now walking or running on a treadmill is great but the physical
benefits need to be traded off against the time it takes - time that
could be spent doing something else like surfing the web, or watching
a movie. Well not anymore! Now you can exercise and be a geek at the
same time with the amazing netbook treadmill hook!
The hook is made from 40cm (16") of 18mm (1/2") pipe, 6 x elbows, 2 x T-pieces, and 2 small rings of 25mm (1") pipe. The pipe sections are positioned under the netbook so that they don't cover any of the vents and the two ring sections prevent any possible lifting of the netbook's front edge.
The hook on the treadmill and the netbook on the hook both seemed to be quite secure but as an added precaution I also attached some small sections of rubber grip mat using hot-melt glue. The truly paranoid could also add a velcro strap that loops underneath the hook and over the netbook at the base of the screen.
I'm currently working on a simple trackball hack made from a plastic roll-on deodorant ball (which looks very cool when lit by LEDs) and an optical mouse which I hope will be easier to use while walking/running than a touch-pad. Stay tuned!

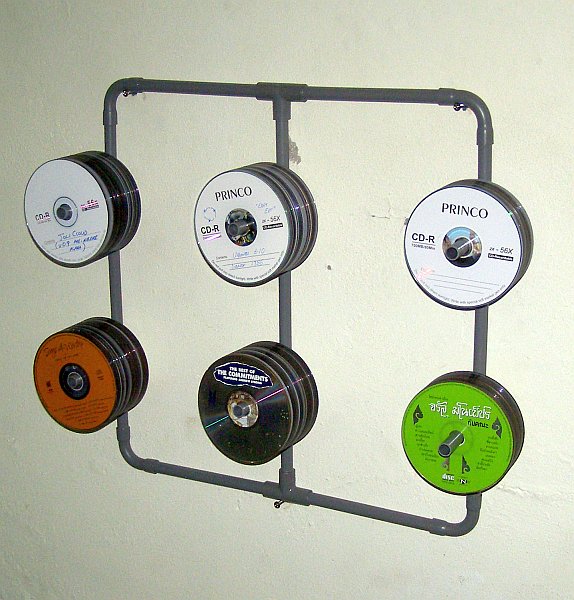 These are some wall-mounted racks I
built in response to all of the CDs/DVDs/CD-ROMs/DVD-ROMs I find lying
around our house. I think what I really want is some sort
of storage robot that could
hold all of my discs and just "hand" me the one I want in response to
a search query or mount it in a drive for me. Alternatively a robot
that could convert and backup all my physical media to a large enough
hard drive would be really cool (you can
actually buy
these or build your own).
These are some wall-mounted racks I
built in response to all of the CDs/DVDs/CD-ROMs/DVD-ROMs I find lying
around our house. I think what I really want is some sort
of storage robot that could
hold all of my discs and just "hand" me the one I want in response to
a search query or mount it in a drive for me. Alternatively a robot
that could convert and backup all my physical media to a large enough
hard drive would be really cool (you can
actually buy
these or build your own).
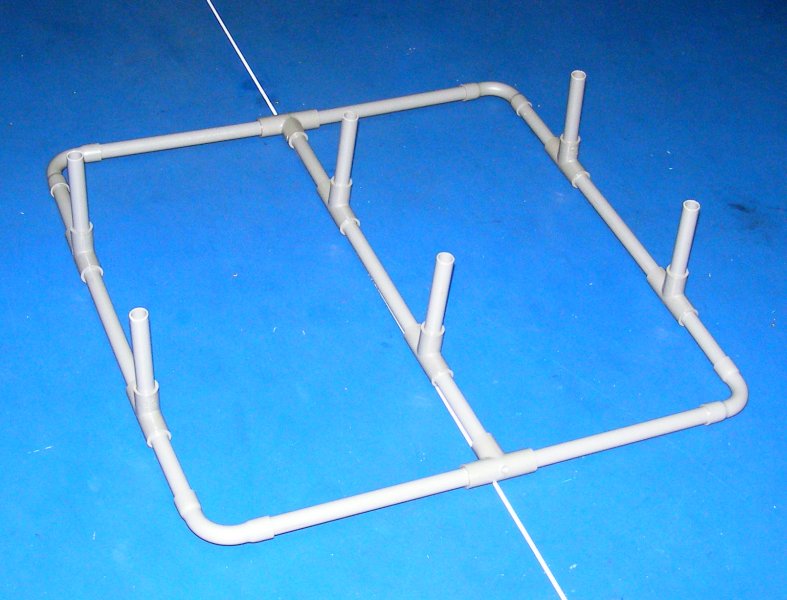
The racks are made from 10mmm (1/4") pipe which fits the center hole on the discs perfectly and I allowed approximately 20cm (8") between spindles. I made one for holding movies and CDs with six spindles (using 8 x T-pieces, 4 x elbows and around 2.6m (8'6") of pipe) and one for software with four spindles (using 4 x T-pieces and 4 x elbows). See the pictures below. If you choose a suitably colourful disc for the top of each stack then it looks like a poor man's BeoSound 9000.
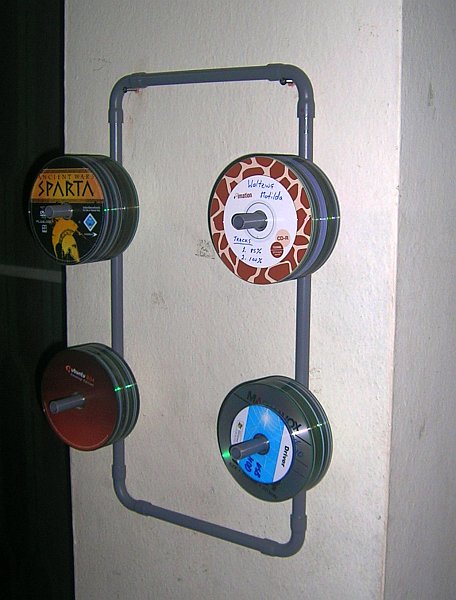
The grey PVC pipe is water pipe but it's normally used for agricultural irrigation and low-pressure applications (rather than storage racks!). The same size pipe and fittings are also available in yellow which is for electrical and telephone cabling but my kids voted for the grey colour.
Each of the spindles holds about 50 discs so the CD/DVD rack holds about 300 discs while the software rack holds about 200 discs. I wanted to have enough room on each spindle so you could browse the discs without having to play towers of Hanoi but I realise now that I should have included at least one extra spindle on the rack for movies and CDs - it's already too full!
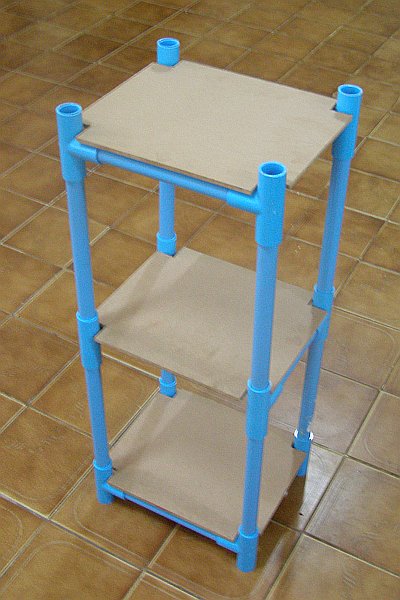 There was a gap
next to my side of the bed that would constantly fill with books and
papers so I decided that I needed some bedside shelves - so I could
accumulate even more books and papers. These 3-tier shelves are made
from 20mm (3/4") PVC water pipe using 12 x T-pieces (4 per
shelf), 2 lengths of pipe that connect the front and rear sections, 4
lengths of pipe to connect the sides and 8 lengths of pipe to separate
the tiers.
There was a gap
next to my side of the bed that would constantly fill with books and
papers so I decided that I needed some bedside shelves - so I could
accumulate even more books and papers. These 3-tier shelves are made
from 20mm (3/4") PVC water pipe using 12 x T-pieces (4 per
shelf), 2 lengths of pipe that connect the front and rear sections, 4
lengths of pipe to connect the sides and 8 lengths of pipe to separate
the tiers.
The three shelves are pieces of 6mm (appox. 1/4") medium density fibreboard(MDF) with 35mm (1.4") squares cut into each corner. Unlike most of my projects I used a small hammer to simply tap the pipes and connectors together instead of gluing them. The shelves just sit in place and help keep the stand square.
If you are planning on making a free-standing shelf then I would recommend gluing the pieces and adding one extra shelf so that there is another set of pipes between the front and rear faces. This shelf was made to fit into a specific space so it doesn't have any room to move and does the job very well. You can see a picture of it in place below.


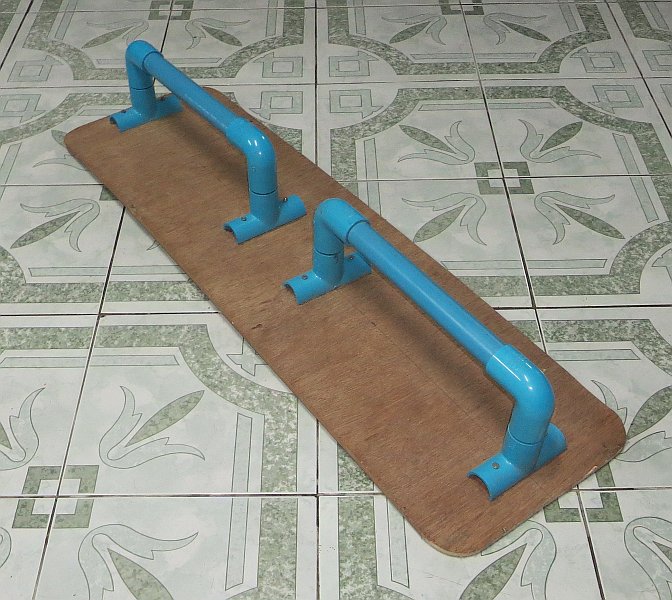
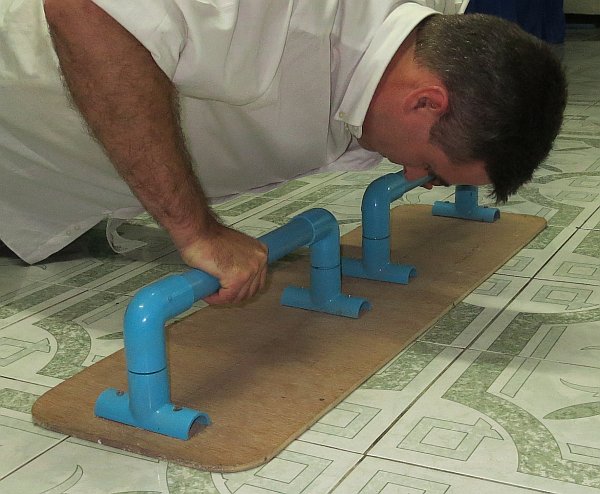
People often come up to me in the street and say "Dr Tom, I thought computer scientists had long beards and bony girl arms but look at you - you're so incredibly buff! You're like a chiselled Greek statue that's come to life and is able to help me with all the problems my computer's been having lately. What's the story?". I tell them that while I'm far too busy to look at their computer problems all is not lost because they too can have arms that are the envy of computer programmers everywhere. For only 12 monthly installments of $19.99 they can say "Hello!" to my secret weapon: the Bicepperizer 3000.
Or they could make their own using:
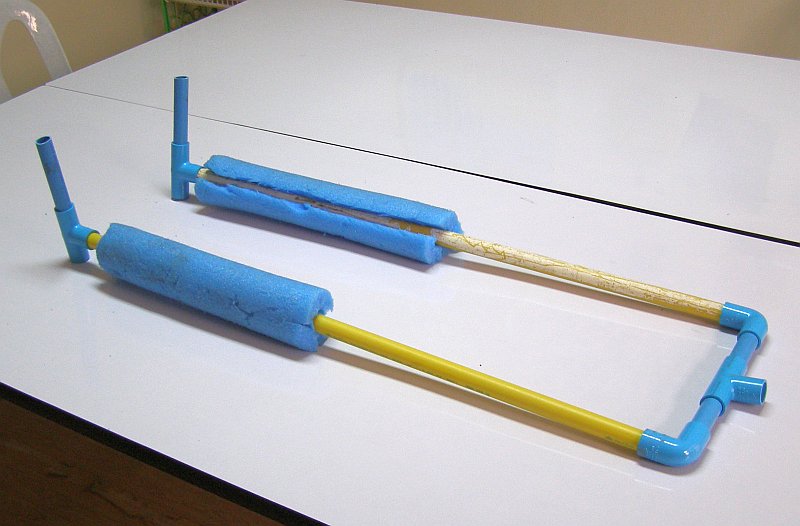
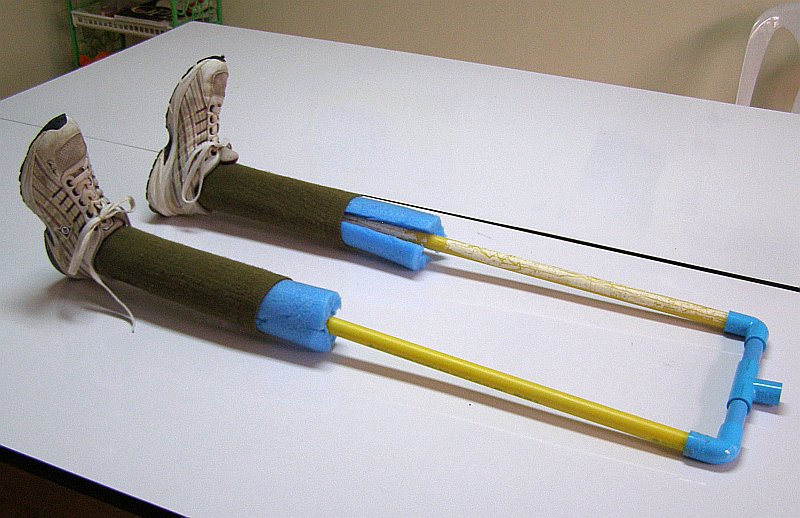
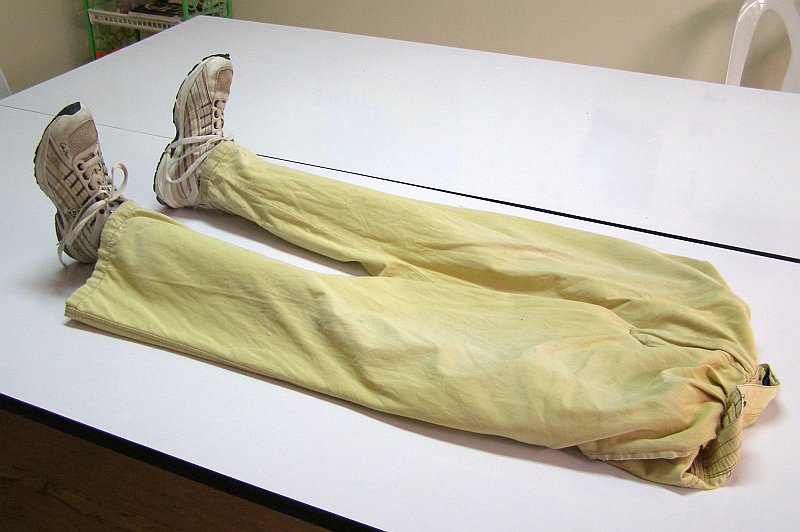
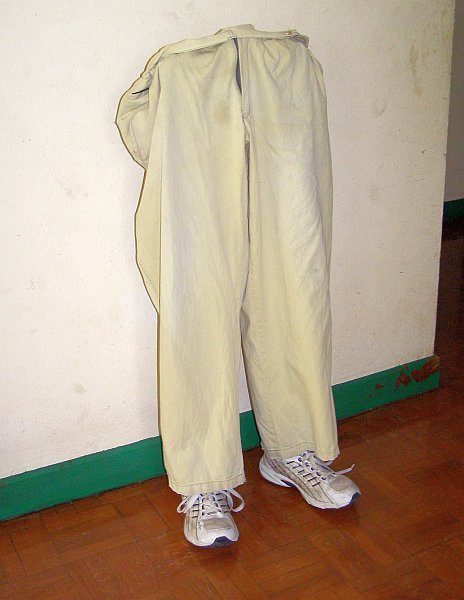 These free-standing legs look like something that literally just walked off the set of the music video for Herbie Hancock's "Rockit" but they were made as a quick prop for a play. In the scene, the legs were poking out the end of stretcher to imply that someone was being carried.
The Ray Santilli-esque pictures below show the construction of the legs which are made from 18mm (1/2") PVC pipe using 3 x T-pieces and 2 x elbows. The "hips" are 30cm (approx. 11&3/4") wide with an overall height of 90cm (approx. 35&1/2"). I used yellow electrical conduit pipe for the legs simply because I had two lengths on hand that were long enough. The center T-piece in the hips would allow a torso to be attached but this was never used.
A friend had given me some old UV-damaged pool noodles and I used these to pad out the ankles and calves. A pair of thick socks hold the pool noodle sections in place and a pair of pants and some shoes complete the illusion.
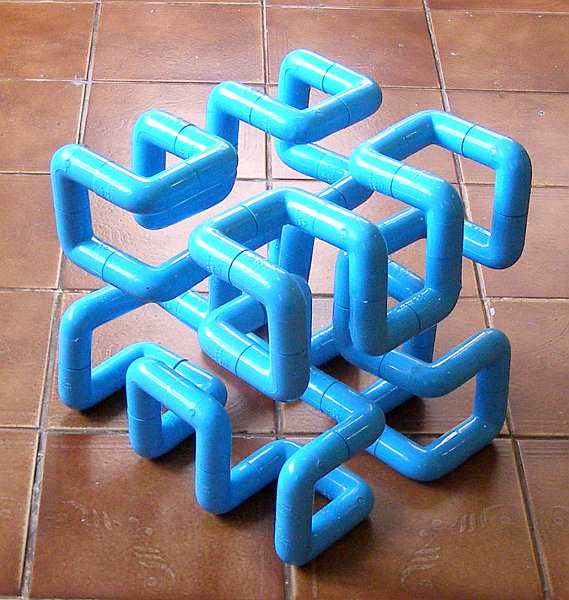 Perhaps not quite an everyday use for PVC pipe but this is a 4 x 4 x 4 (2nd order) Hilbert Cube I made during the 2012 Christmas holidays. A few years ago I saw this design for a radiator inspired by the Peano space filling curve which was made from PVC connectors. I have wanted to build one of the curves ever since so when my wife aked me what I wanted for Christmas I asked for 64 x 18mm (1/2") PVC elbows and 64 x 6cm = 3.84m (12'8") of 18mm pipe.
The Hilbert cube is a 3D extension of the 2D Hilbert curve which is a variant of the fractal, space filling Peano curve. The radiator design is an 8 x 8 x 8 (3rd order) cube which uses 512 connectors like this sculpture or this 3D printed model. Here is another 4 x 4 x 4 Hilbert cube that uses connectors more like those in the proposed radiator design and plans for a 3D-printable cube.

When I was an honours student back in the late 90's our research lab used Silicon Graphics hardware and the first image above of my cube reminds me of their old "bug" logo. Perhaps I'll build one in a future project.
 This project is a little late to the party - if you will excuse the pun (oh wait, wrong game!) - but I recently thought it might be fun to make a Wii-mote holder for playing Mario Kart that gives you a fixed axis of rotation so it feels more like driving.
There are a large number of Wii-mote driving accessories you can buy like the Wii Wheel or DIY versions like this one. Someone also built this ingenious self-centering trainer and it should be possible to re-use the rubber-band powered righting mechanism from the PVC cars to do something similar with this design.
The design consists of two main parts: the "steering wheel" that holds the Wii-mote and a pedestal that supports the wheel. The part of the wheel that holds the actual Wii-mote is made from a 14cm (5 & 1/2") length of 35mm (1 & 1/4") pipe with a section cut out (the same method is used to hold the Wii-mote in the Wii-mote Holder and DIY Wii Zapper projects described above). This is screwed onto the rest of the wheel mechanism which is made from:
The top half of one of the T-Pieces is cut in half and this is the mounting point for the 35mm pipe section which is attached using 2 x 2cm (3/4") screws (see the pictures below). The end-cap shouldn't be glued and it can simply be pushed onto the back of the wheel assembly after it is inserted into the top of the pedestal but the rest of the 18mm parts should be glued together.

The pedestal actually consists of two parts - a thicker top section that looks like a sledge-hammer which has a mounting point for the wheel assembly, and a thinner lower section that is shaped like the letter 'T' (in the middle of the picture below left) which slides into the top section. The top section of the pedestal is made from:
The centers of the two smaller 20mm T-pieces are cut out and glued inside the two opposite ends of the 25mm T-piece to reduce the internal diameter so that the wheel will fit smoothly and turn without too much play (for more details see the description of Coffee Grinder Puzzle Bobble which uses the same technique for its pedestal).
The 'T'-shaped lower half of the pedestal is made from:
The center part of the 'T' is 62cm long and the two sides are each 20cm long.

Drill three or four holes in the lower T-shaped part of the pedestal perpendicular to the sides of the 'T' (see the left picture above). Then drill a hole parallel to the wheel's axis through the top pedestal section (about 12cm (4 & 1/2") from the end of the pipe) as in the middle picture above. You can then use a 55mm (2 & 1/4") long bolt and wing-nut to adjust the height of the pedestal.
I also glued a small section of 25mm pipe to the end of the pipe on the outside of the lower part of the pedestal and another section on the inside of the top part of the pedestal (see the picture above right). The two small pieces can slide past each other when you insert the lower pipe into the upper pipe and they will help reduce the amount of movement between the two pipes.
Having built this Mario Kart Wii-mote holder my son then informed me that the 'B' trigger button underneath the Wii-mote is actually used for power sliding (although it can be set to happen automatically). No wonder I keep losing! Unfortunately with this design you can't access the 'B' trigger button on the bottom of the Wii-mote (which is beneath the D-pad). You would need to add some other mechanism - perhaps a trigger - that mechanically pushes on the 'B' button when you press it (apparently the Wii Wheel has a button on the back that works like this).
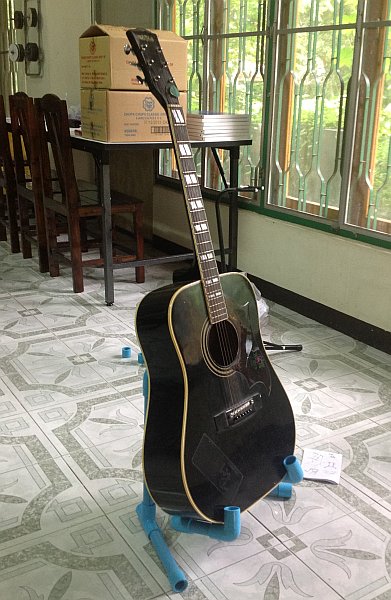 This is a stand I made for my acoustic guitar. One of the guitarists at church had a custom made metal stand with a design that I thought was really cool. I took a photo of his stand and modified the design to make this PVC pipe version.
The stand is made from 180cm (5'11") of 20mm (3/4") pipe plus 6 x elbows, 4 x T-pieces and 2 x end caps (I actually used some T-Piece offcuts from some of my other projects instead of end caps). As you place the guitar in the stand it is possible for the bottom of the guitar to catch on the lip of the upside down T-piece that holds the two supporting arms. To help prevent this I cut a section from an old T-piece offcut and tapered it at one end (see the middle image below). This is then glued onto the center piece of pipe above the T-piece (see the image below right) so the guitar will now just slide straight over the lip.

The base with splayed legs is very stable and the side view below will give you an idea of the angle I used on the center support. I decided to spray paint the stand black so it matches my guitar and I also glued six small pieces of grip mat onto the stand at the points beneath the guitar and where the back of the guitar touches the stand to help prevent any sideways movement.


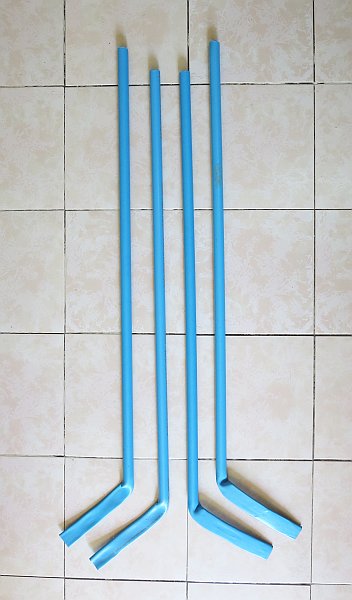
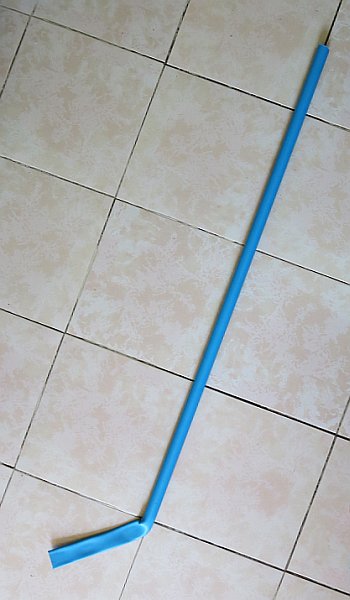 Ice-hockey sticks and pucks are
hard to come by here in Thailand so these are some PVC hockey sticks I
made for a Winter Olympics-themed party where we used some wooden
drink-coasters as pucks for a slapshot shootout competition.
Ice-hockey sticks and pucks are
hard to come by here in Thailand so these are some PVC hockey sticks I
made for a Winter Olympics-themed party where we used some wooden
drink-coasters as pucks for a slapshot shootout competition.
PVC is a thermoplastic and I'd seen my father bend large PVC pipes back home on the farm by heating them over a fire but this is the first time I have used bent PVC in any of my projects. You'll find some great projects online that require bent PVC pipe like these snowshoes but before doing this yourself you should follow some safety precautions.
The sticks are made from 130cm (4'3") lengths of 20mm (3/4") pipe and I put a mark on the pipe about 22cm (approx. 8 1/2") in from one end for the start of the bend. Using a gas stovetop I then moved the end of the pipe backwards and forwards high above the flame while rotating for about 2 minutes until it became floppy. I then placed the pipe down on the floor tiles and flattened the pipe by pressing on it with a flat-soled rubber shoe (to keep my hands cool) while also holding the pipe at an angle of about 45 degrees. After holding for about 30 seconds while the PVC cools, it then keeps the new shape.

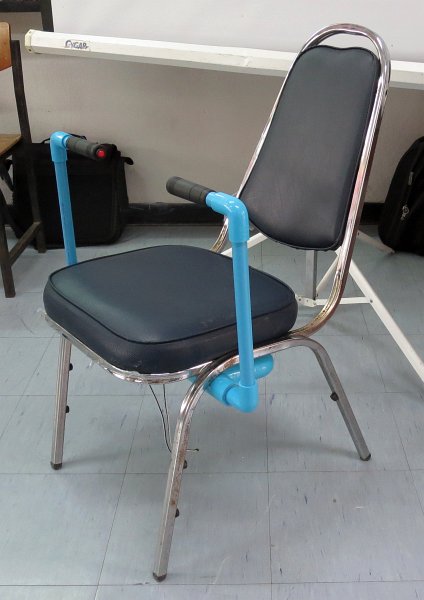 This is a chair I modified with the help of some engineering
students from Chiang Mai University
to play the free online multiplayer 3D tank battle
game BZFlag. As part of an English
camp we ran for the Engineering faculty I held some workshops where we
added PVC pipe levers to the sides of an old chair. Two optical mice
(mouses?) mounted underneath the chair were used to detect the
rotation of the levers and two buttons (used to fire and re-spawn) were
patched into the left mouse buttons on the mice.
This is a chair I modified with the help of some engineering
students from Chiang Mai University
to play the free online multiplayer 3D tank battle
game BZFlag. As part of an English
camp we ran for the Engineering faculty I held some workshops where we
added PVC pipe levers to the sides of an old chair. Two optical mice
(mouses?) mounted underneath the chair were used to detect the
rotation of the levers and two buttons (used to fire and re-spawn) were
patched into the left mouse buttons on the mice.
The two levers control your in-game tank via skid steering which is similar to how the original 1980 Battlezone arcade game worked. Pushing both levers forward or backward moves the tank forwards or backwards while pushing the levers in opposite directions will cause the tank to turn. I wrote a script for GlovePIE that watched the rotation of the levers as seen by the two optical mice under the chair. The script then moved a fake mouse accordingly to steer the in-game tank.
Apart from the chair, the other parts we used are shown in the left picture below. The top row of 25mm (1") PVC pipe connectors and the middle row of 20mm (3/4") T-pieces were used to construct a mount for the two levers that was screwed underneath the chair (see the center image below). The center sections of the 20mm T-pieces were cut out, sanded down, and then glued inside the horizontal ends of the two 25mm T-pieces. This reduces the internal diameter of the larger T-pieces so that the levers which are made from 18mm (1/2") pipe (see the picture on the right) fit smoothly inside but can still rotate. This is the same method I used to make the pedestals for the Coffee Grinder Puzzle Bobble controller and the Mario Kart Steering Wheel.
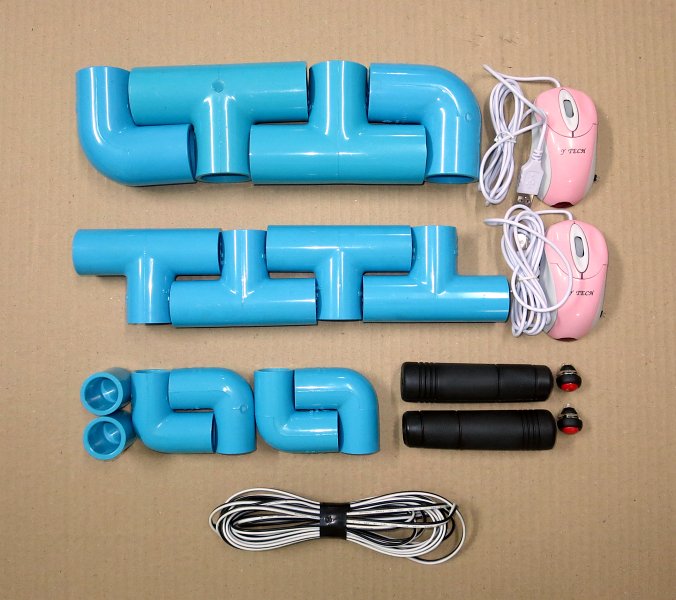
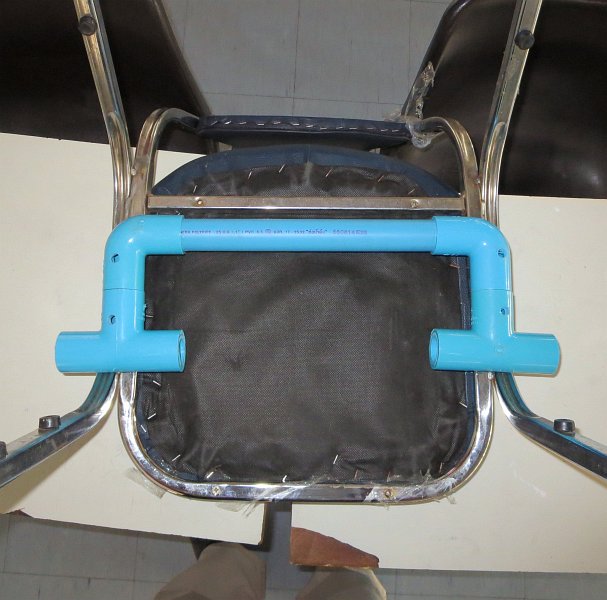
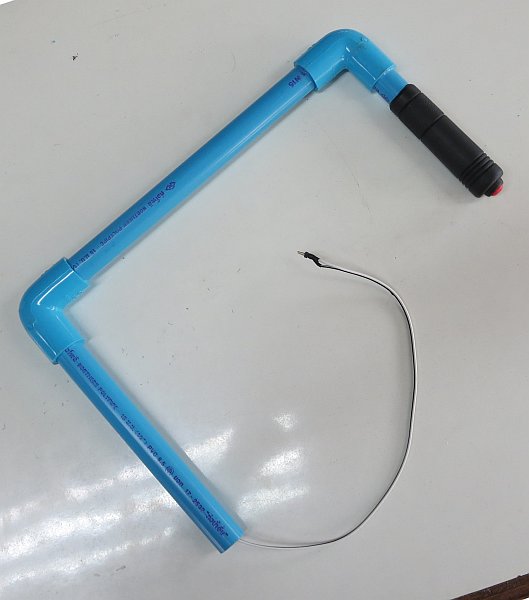
To stop the levers from sliding out of the T-pieces mounted underneath the chair we made two "rotation sleeves" that fit over the 18mm pipe and these were held in place with a single screw. The sleeves were constructed from three rings of plastic with the inner-piece sanded out so the end of the lever could slide through and the outer piece was made from a 25mm connector off-cut. We wrapped some masking tape around the sleeve to increase it's visibility to the optical mouse (see the left picture below).
Before the workshops started I had modified the optical mice by adding a connector that was patched into the mouse buttons. We simply hot-melt glued the mice onto the 25mm T-pieces in a position where they could "see" the tape-covered rotation sleeve and plugged the buttons into the connectors on the mice (see the center picture).
To build the controller we worked in three teams. The first team constructed and added the mount point to the chair while the second team made the two levers. I gave the third team a simple text-based BZFlag world map which they modified so the tanks were playing on a giant version of the Engineering faculty's logo (see the screen shot below right).


The controls were a little flaky because the positioning from the optical mice was relative. For example, if you started with a lever in the center position and moved it backwards and forwards quickly a number of times and then returned it to the center it would be in a different place. It was still fun to play but required me to add an option to the script where you could move the levers back to the center (stopped) position and press a key to re-center the script. A better alternative would be to use joystick potentiometers or just potentiometers which could give you an absolute position for the levers but this would have also required additional work to provide suitable lever stops so they couldn't rotate too far.
 This is a 3-chime PVC pipe train whistle I
made for a friend's son who really
likes Thomas
the Tank Engine. Our kids had a really nice sounding wooden whistle when they were young and I thought it should be possible to make one out of PVC pipe. Sure enough, a quick Google search turned up plenty of information on building PVC train whistles.
This is a 3-chime PVC pipe train whistle I
made for a friend's son who really
likes Thomas
the Tank Engine. Our kids had a really nice sounding wooden whistle when they were young and I thought it should be possible to make one out of PVC pipe. Sure enough, a quick Google search turned up plenty of information on building PVC train whistles.
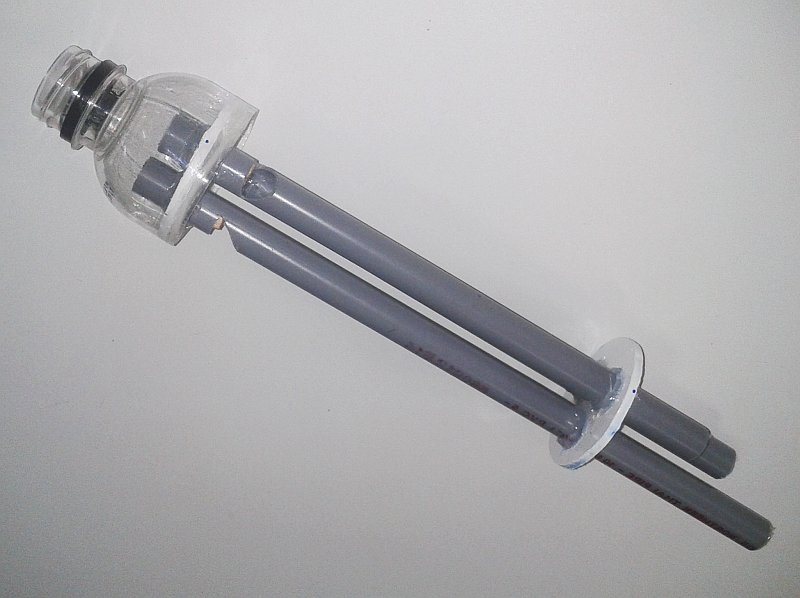
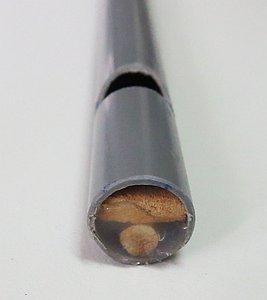
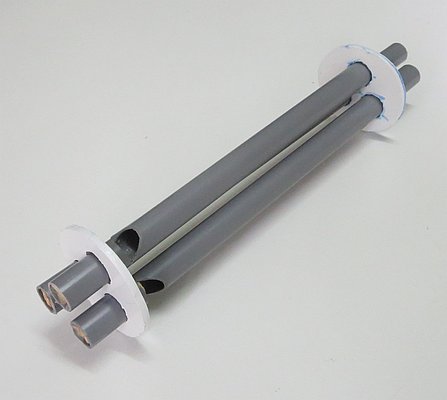
The three individual whistles are made from 27.5cm (approx. 10 & 4/5"), 25.5cm (10"), and 22.5cm (approx. 8 & 4/5") lengths of 10mm (1/4") grey electrical grade PVC pipe. I could only find a length of half-round wooden dowel so I used this to make the fipple for each whistle and filled the rest in with part of a wooden chopstick and hot-melt glue. The notches (or "windows") are about 3cm in from the end of the pipe and I copied this idea for mounting the tubes so they could all be blown together. More hot-melt glue was used to attach the two acrylic discs but this glue was too hot for the plastic water bottle mouthpiece which I sealed with two-part epoxy resin instead. The end of each pipe was plugged using two small pieces of the half-round dowel glued back to back and sanded to fit.

I picked my pipe lengths at random and originally intended to cut them or plug them with varying lengths of dowel to tune them. Using the Tuner - gStrings app on my phone I checked the pitch of the whistles which were very close to F, G, and A (from longest to shortest). However, in the end I was happy with how the completed whistle sounded so I stayed with the original lengths. Here's what the whistle sounds like:
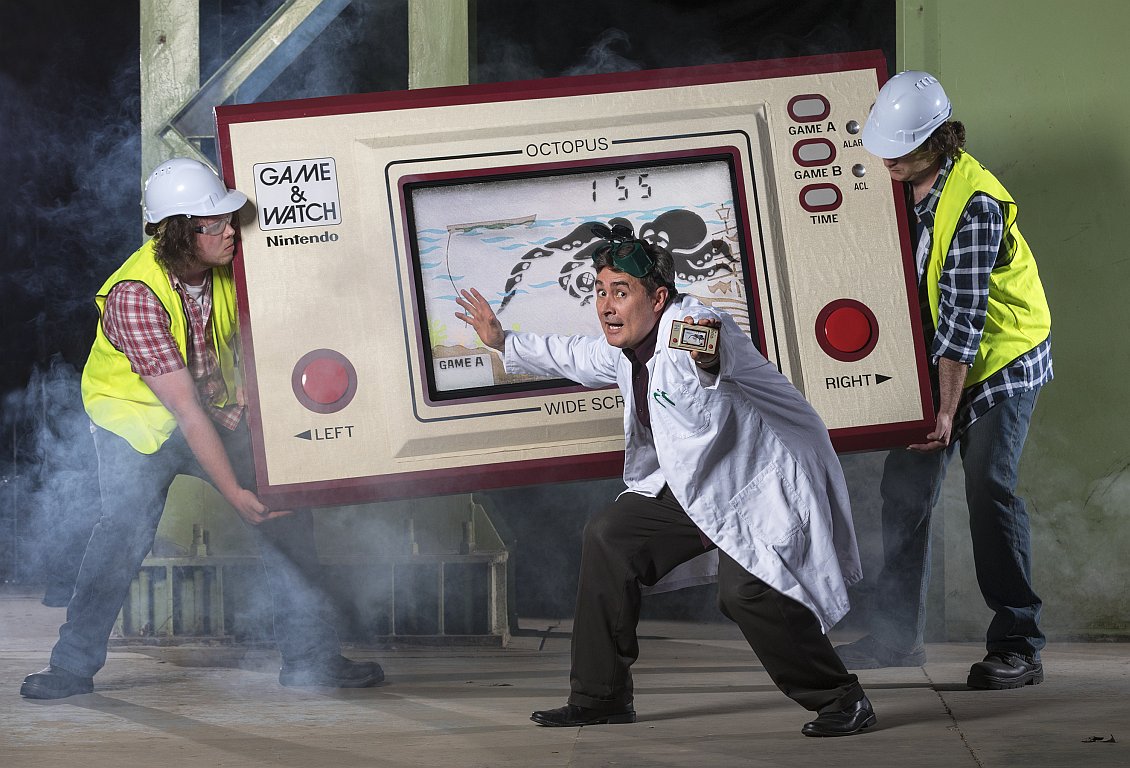
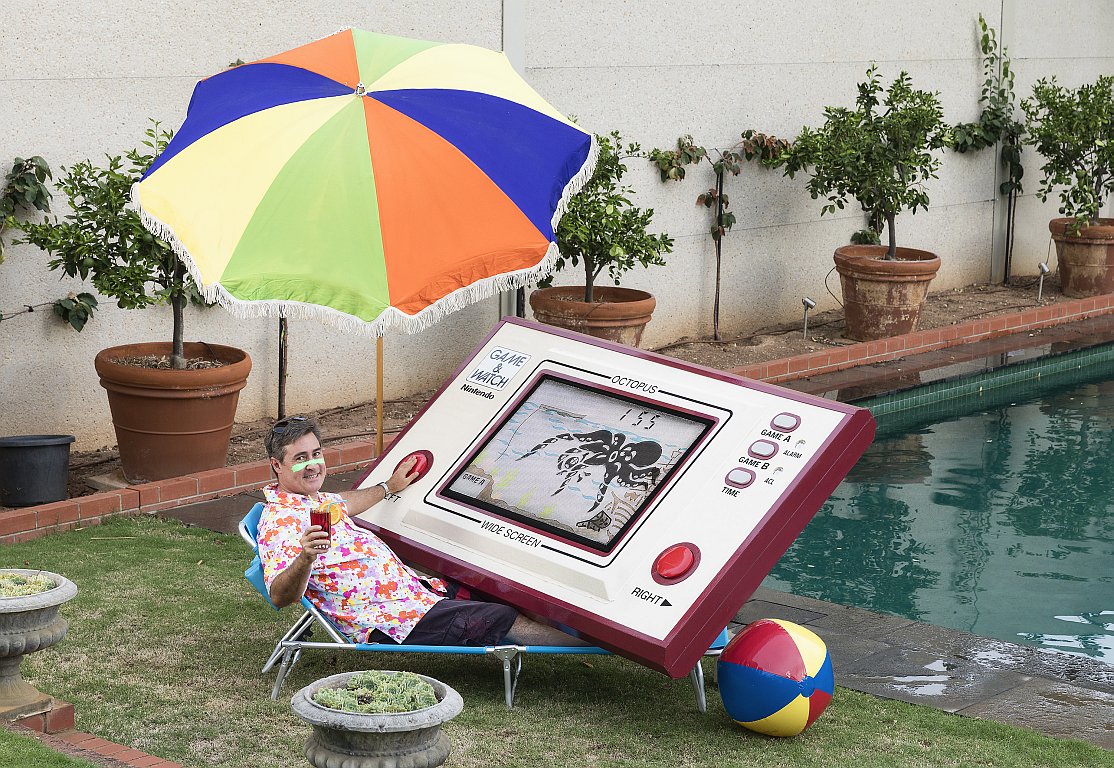
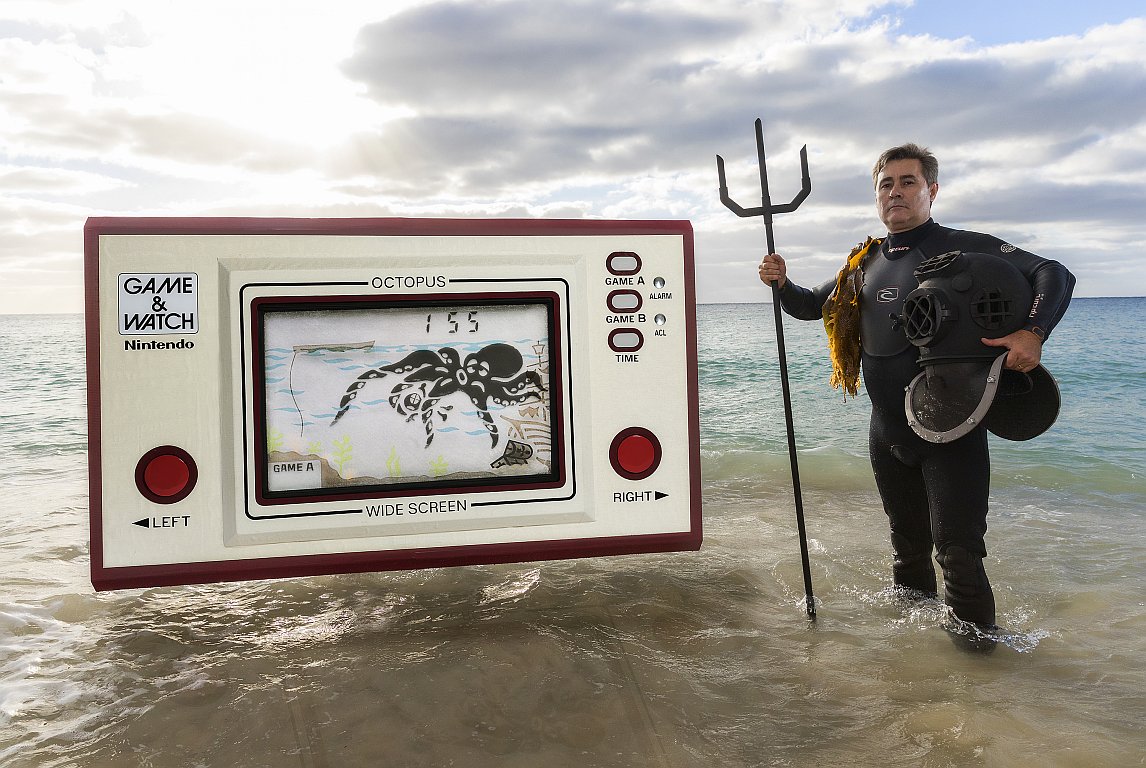 This is a trident I made as a prop for one of the three photoshoots I did in early 2018 for the Guinness World Record: Gamer's Edition 2019. Guinness engaged the services of the very talented Ben MacMahon for the photography and he was great to work with. This is the shot they chose to use in the book and we also did a poolside shoot
My wife and I visited Thailand at the start of 2018 and I brought some 18mm (1/2") Thai PVC water pipe and fittings back to Australia with me to build the trident. The head of the trident is made of 4 x 45 degree elbows and one 4-way piece and the overall height is 181cm (6'). I painted it using the same matte black acrylic paint I used for the diving helmet and the shaft breaks into two pieces so it fits comfortably into our car. A small insert joins the two pieces together.
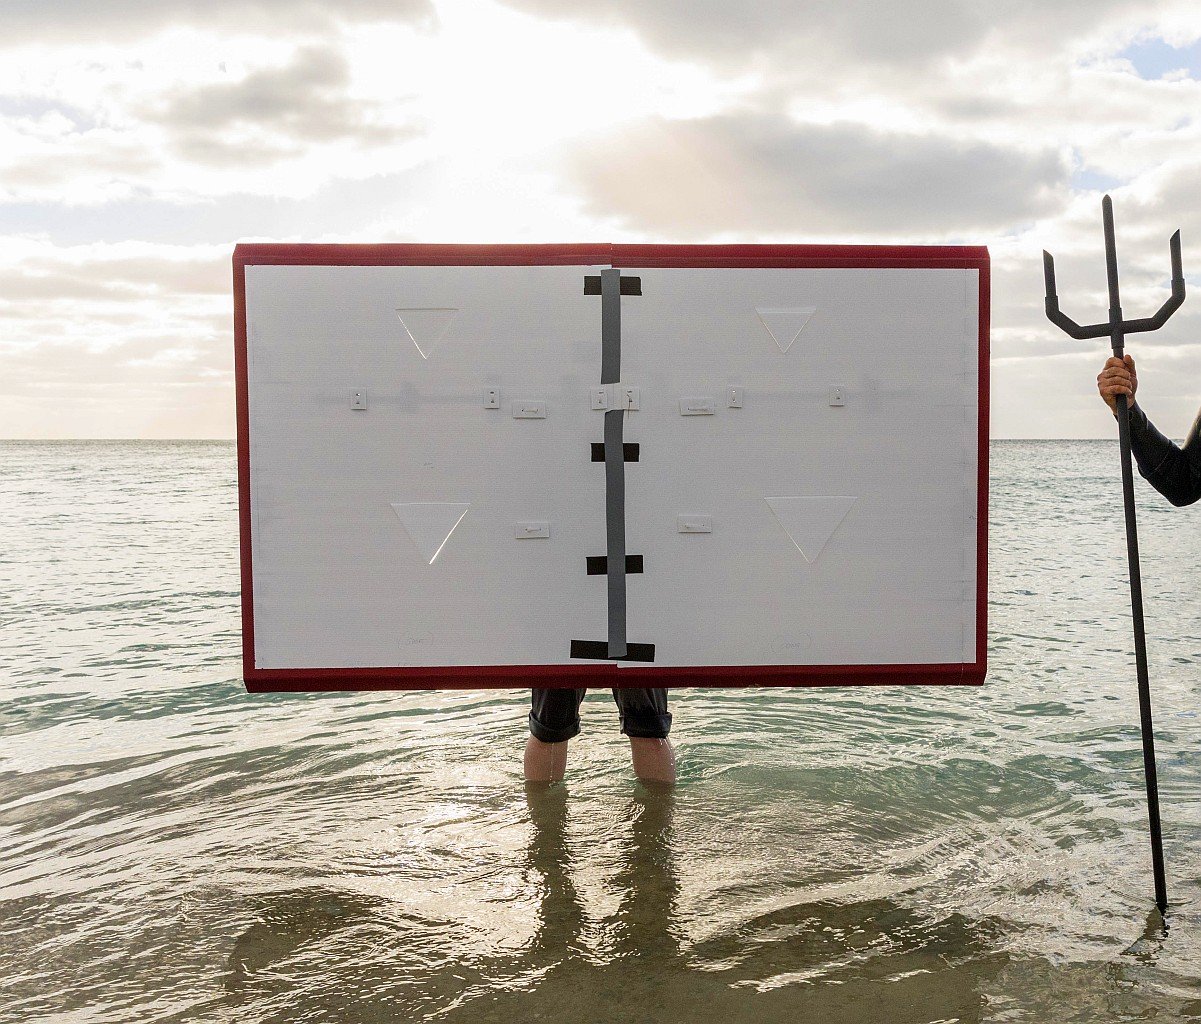
The middle picture below shows the final image from this shoot but we didn't want to risk taking (or powering!) the World's largest playable Game & Watch in the water. To make the shot possible I built a stand-in out of corrugated plastic (commonly known as "corflute" in Australia or "future board" in Thailand) with the same dimensions as the giant version of the game. The edges were painted using the same high gloss enamel paint as the orginal and this made it easier for Ben to later photoshop a studio shot he took of the giant Game & Watch's face onto the stand-in.
My lovely wife was kind enough to stand in the water and hold the game's stunt double during the photoshoot (you can see her legs poking out at the bottom in the last photo above). Ben also brought a team along to help on the day which included three people holding remotely triggered flashes and someone on the beach who would shout out "raise!" when a wave was coming so my wife could safely lift the stand-in out of the way. There were two PVC handles on the back of the stand-in which was made in two halves so it would fit in the back of the car.
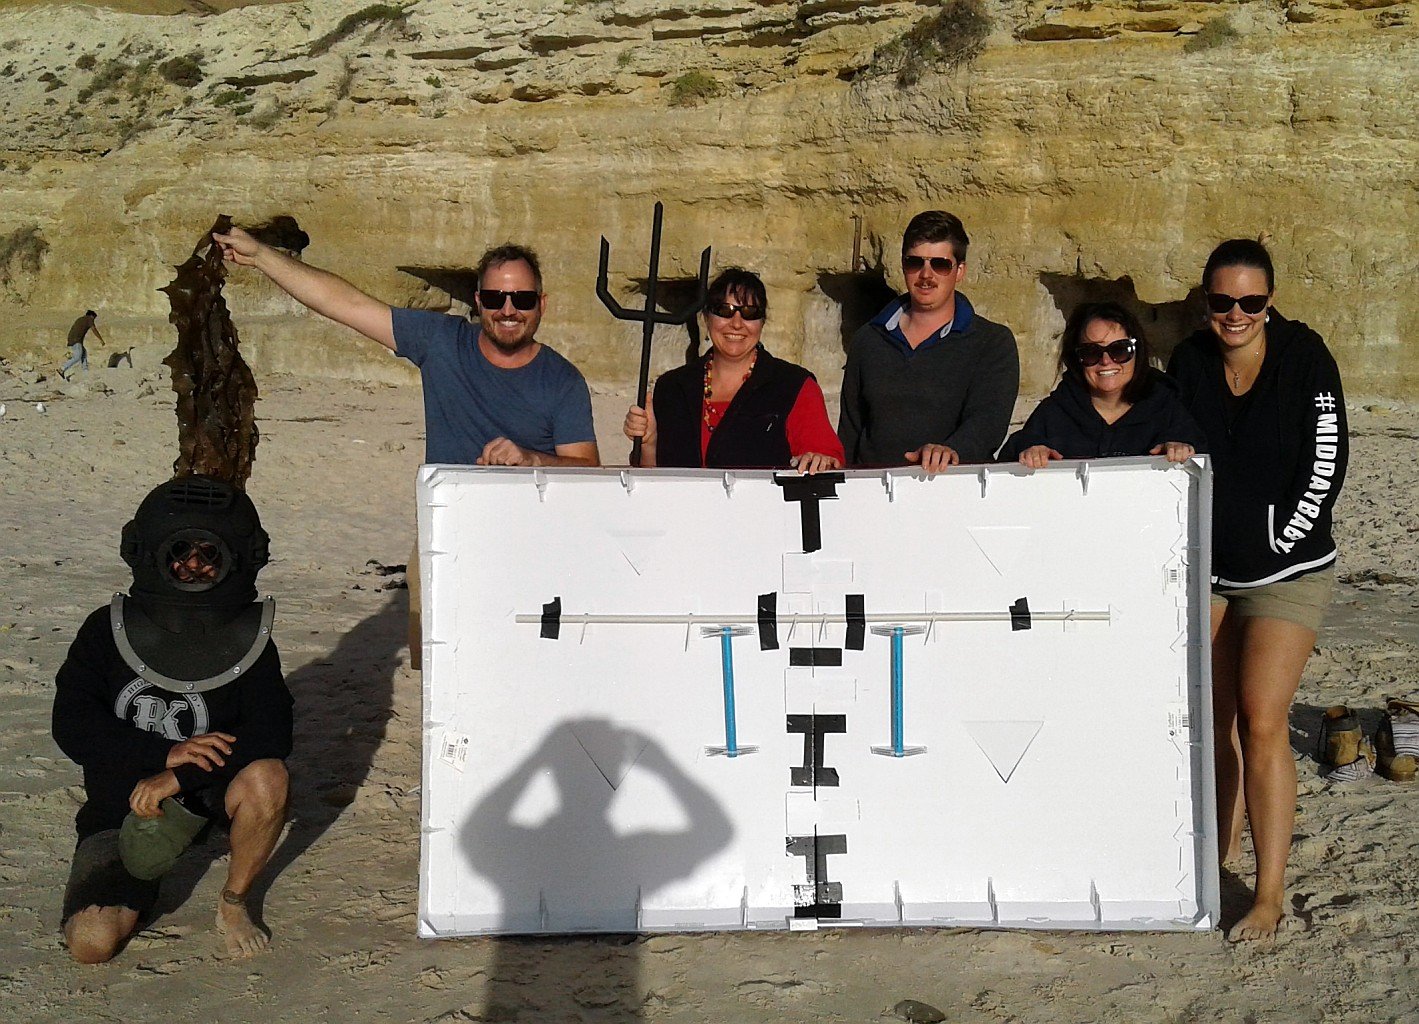
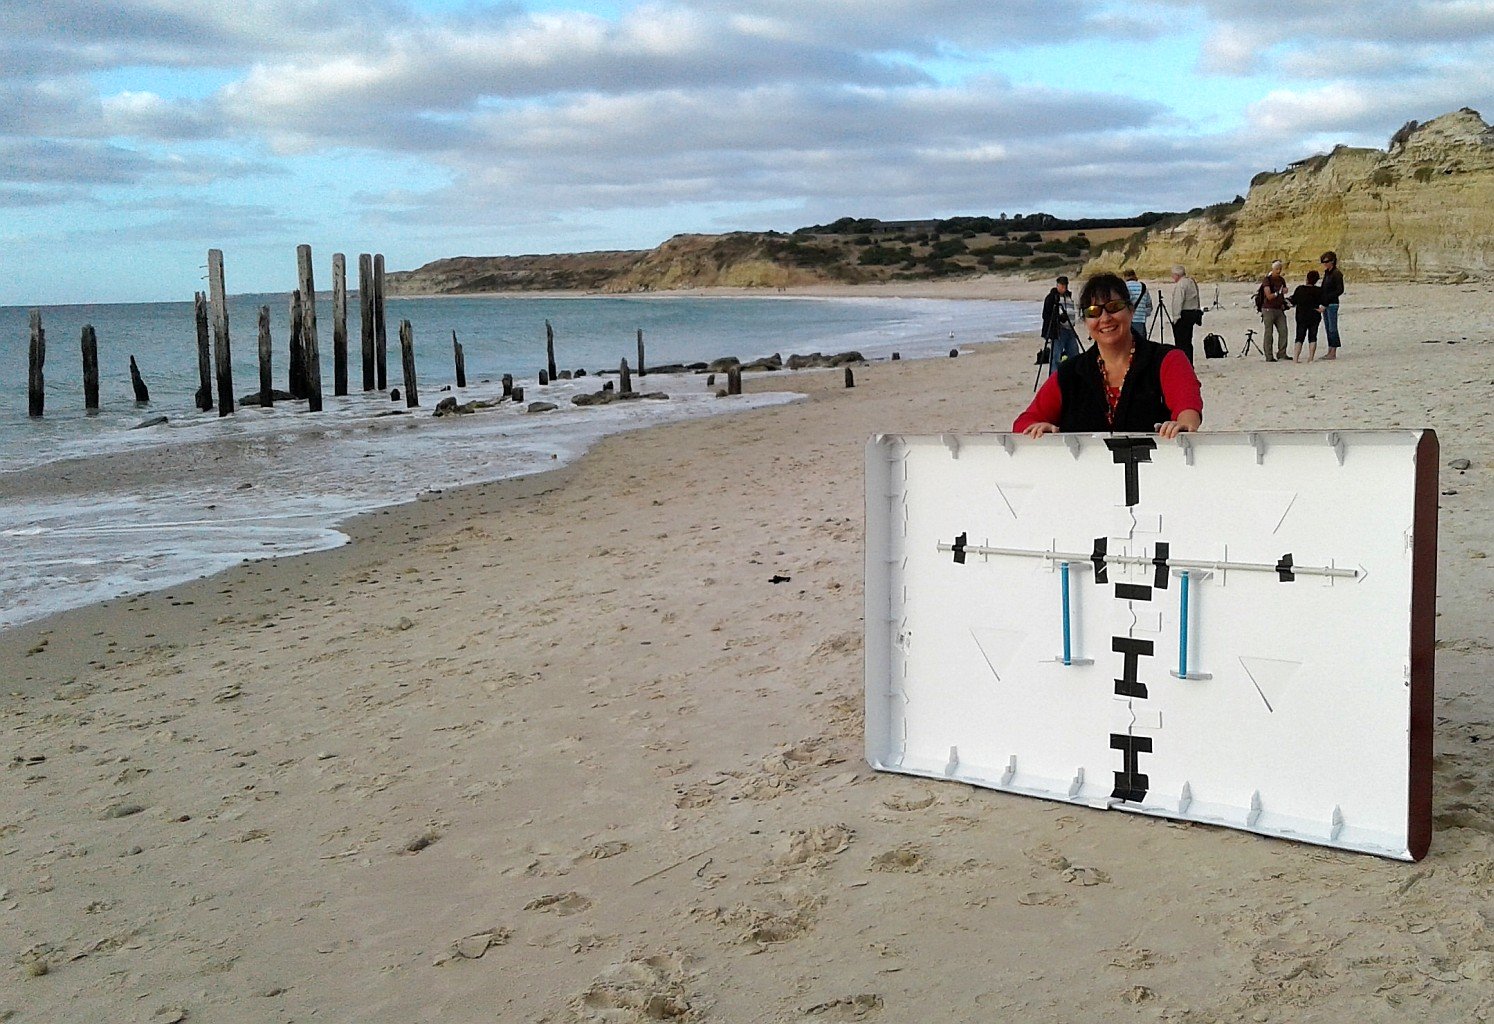
We took the photo at the very photogenic Port Willunga Beach and we're not sure what the other people on the beach - a photography club and a Japanese couple having wedding photographs - thought we were doing!
You may also be interested in reading more about some of the above projects and/or some of my other projects:
