
Thomas Tilley
[ Home ] [ Publications ] [ Resume ] [ Family ] [ Projects ] [ The Others ] [ Sitemap ]
[ Home ] [ Publications ] [ Resume ] [ Family ] [ Projects ] [ The Others ] [ Sitemap ]
 | |
 | |
 | |
 | |
 | |
 | |
 |
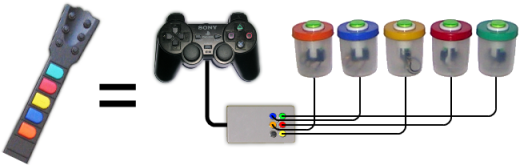
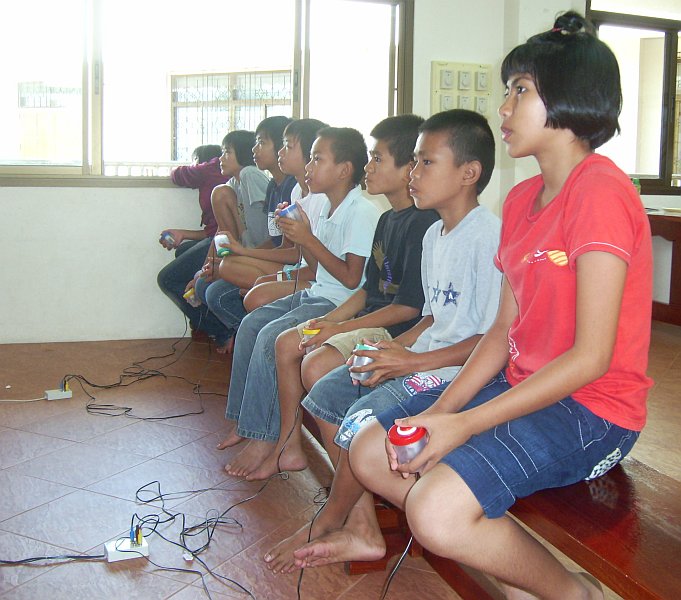
A Thai colleague had seen the virtual pinball table and PVC racing cars at the very first Payap International Innovative Interactive Games (PIIIG) day and asked if we could take them into some of the local schools to help promote the university during science week. I happily agreed but at one of the local schools we were expecting about 1,400 students over two days - and there is only a finite amount of time that you are willing to wait to race a car or play pinball. So, I came up with this - a Playstation 2 DualShock controller hack that allows up to 10 people to play Guitar Hero simultaneously.
Normally in Guitar Hero one person plays one guitar with five coloured buttons and two players can play either co-operatively or against each other. In multiplayer Guitar Hero each person gets to play one coloured button in a team consisting of three to five people. Up to ten people can play at once in two teams of five.
Although each player is only responsible for a single button the game is suprisingly fun with competition against the other team and teamwork which is required to play chords. The students really got into it - cheering when they successfully hit a chord and letting out anguished sighs when they missed.
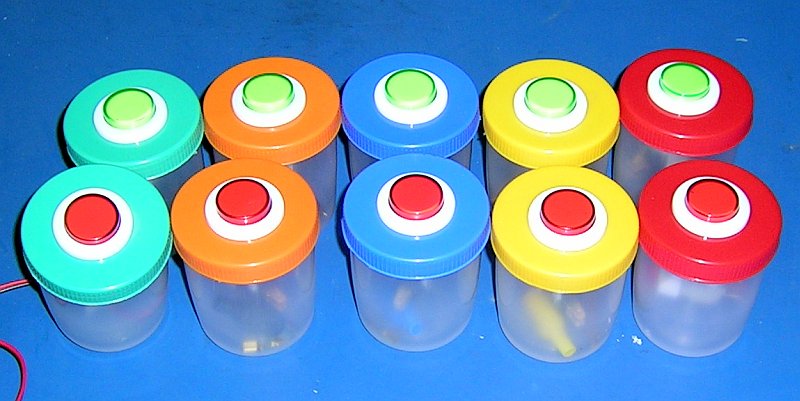
Multiplayer Guitar Hero requires three things: a pair of modified DualShock controllers, ten buttons (two sets of Red, Green, Yellow, Blue and Orange), and a pair of "breakout boxes" for connecting the buttons to the modified controllers.
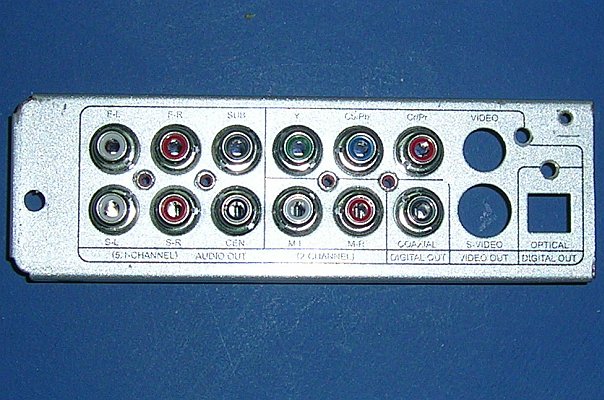
Provided the following modification is done carefully your controllers should continue to operate normally after you're done. We are going to patch a total of 6 wires onto the Printed Circuit Boards (PCBs) inside the DualShock controller (one for each button colour plus a common connection) and connect these to a female 9-pin D-sub miniature connector underneath the controller.
The images below show the six wire connection points (note that this may
not be a genuine Sony controller so your PCBs may vary) and the table
gives the pin-out for the D-sub connector.

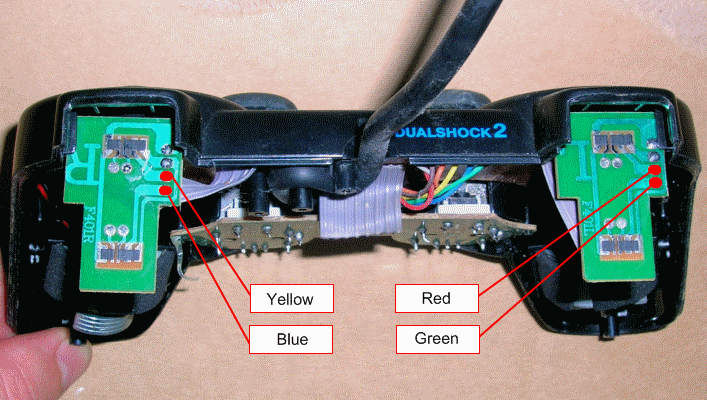

Apart from the wire for the orange button, all of the connection points are existing solder joints. The orange button connection point is a round test-pad on the board but unfortunately it is located beneath the rubber button moulding in the assembled controller. To avoid interfering with the operation of the buttons you can drill a small hole to the West side of this pad and pass the wire through from the back of the PCB. There should be enough room to simply pass the red, green, yellow and blue wires around the side of the small PCBs.
The D-sub connector is mounted to the right of center (as viewed
from the bottom of the controller) because this provided the most
space beneath the connector (near the multicoloured wires).

Note that you can use any pin assignment you wish (provided it
matches your breakout boxes!) but I have some PC-joysticks that have
already been modified for playing other games and wanted to keep a
compatible pin-out so that they can be used with the multiplayer
buttons as well. Here is the pin-out:
| DSUB | Pin | DualShock | Guitar Hero |
|---|---|---|---|
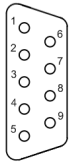 | 1 | Vcc | - |
| 2 | - | - | |
| 3 | - | - | |
| 4 | ( X ) Button | Orange Button | |
| 5 | - | - | |
| 6 | L2 Button | Green Button | |
| 7 | L1 Button | Red Button | |
| 8 | R1 Button | Yellow Button | |
| 9 | R2 Button | Blue Button |
The breakout boxes are made using some female RCA sockets (which came from the back of a faulty DVD player which was also the source of the tact swicthes I used for mark II buttons in my Bugzapper Guitar Hero Controller), a project box, some cable, male 9-pin D-sub connectors and some 3.3k 1/4 watt pull-up resistors (I used 1/2 watt because that's all I could find at the time). Only five of the RCA sockets are needed so I filled the unused one (bottom right) with hot melt glue.
If you look at the button side of the PCBs in the
images above you will see some black rectangles. This is a resistive
film that is printed onto the boards and acts as a pull-up resistor.
The connection points we are using on the PCB bypass this film so we
need to include pull-up resistors either in the breakout box or in
each of the buttons. The resistors are simply connected in series with
the buttons.

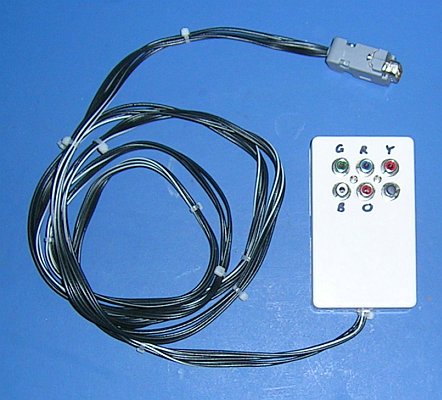
The RCA connectors work OK but in hindsight a more reliable alternative would be to build the boxes using sprung stereo speaker terminals like the one we used for connecting the motorbikes in the REAL-Tron project. With this style of box you don't need the RCA connectors - simply strip and tin the ends of the wires.
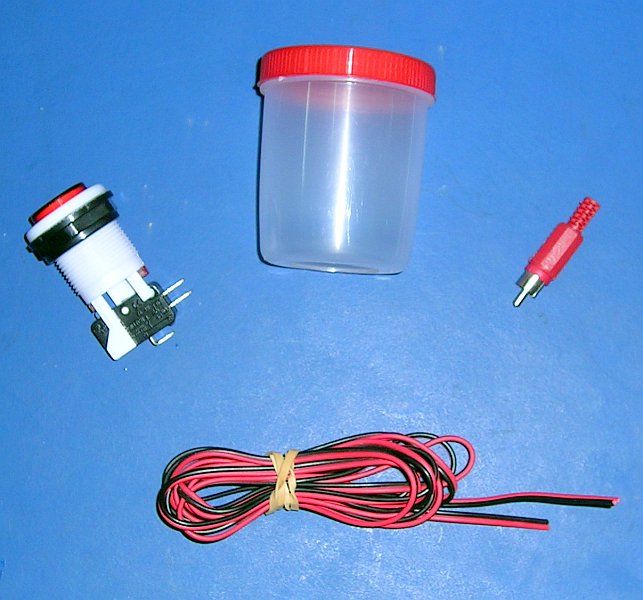
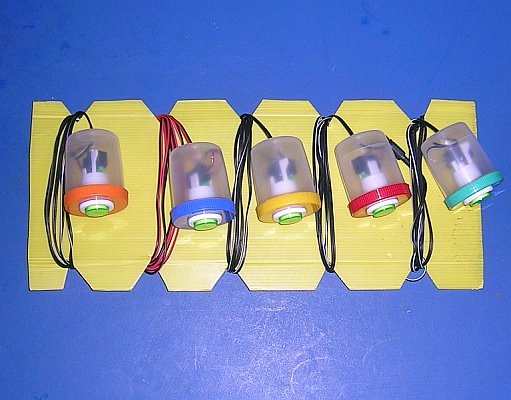
The buttons themselves simply consist of an arcade microswitch button, two spade connectors (for the microswitch), a plastic container, a length of two-strand wire and a male RCA connector. Assuming that the breakout box wouold be located in the middle of each team I allowed about 2.5 meters of wire for the outermost players (the Green and Orange buttons) and 2 metres for each of the Red, Yellow and Blue buttons.
I managed to find plastic containers just deep enough for the
arcade buttons in the required range of fashion colours and used a
large diameter drill to make holes in the lids. I made a smaller
hole in the base for the wire to pass through and placed cable ties on
the wire on each side of the hole. To stop the wires from becoming
tangled I also made two wrap boards with notches cut down each
side.
The minimum number of people who can play is three in "easy" mode but the most fun is with six or more people playing in either "Face Off" or "Pro Face Off" multiplayer mode. Although a little long, Guns and Roses' "Sweet Child o' Mine" is a good starting song for people who haven't played before because it's not too fast and doesn't contain many chords.
If you are wanting to customise the content of the game then you should visit the ScoreHero forums for information about modifying playlists and changing in-game graphics.
Note that when using the controller to play Guitar Hero rather than a guitar the cross ( X ) button is used for "select" and the triangle ( /\ ) button is used for "back". The cross button also doubles as the Orange button in game. This means that if the Orange player presses their button while you are choosing game options they can interfere with the selection. This is just something to watch out for - particularly if you are playing with large groups of people who sit down and start hitting the buttons.
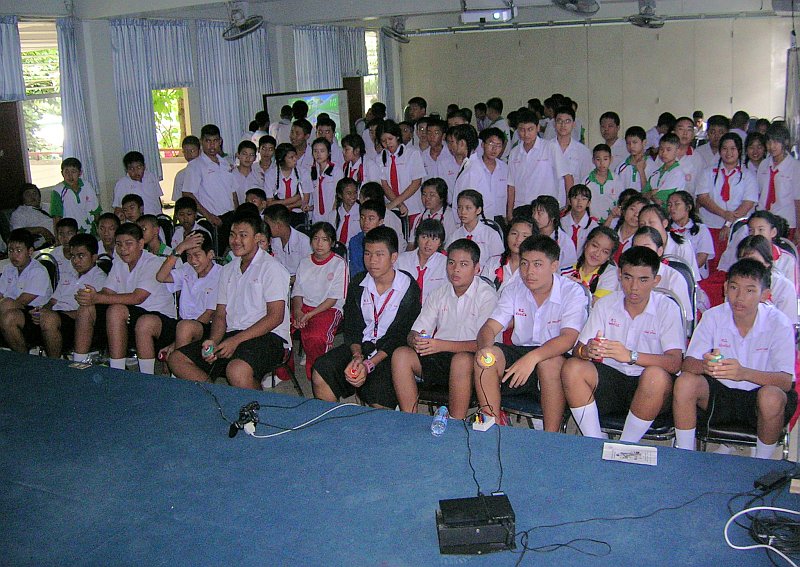
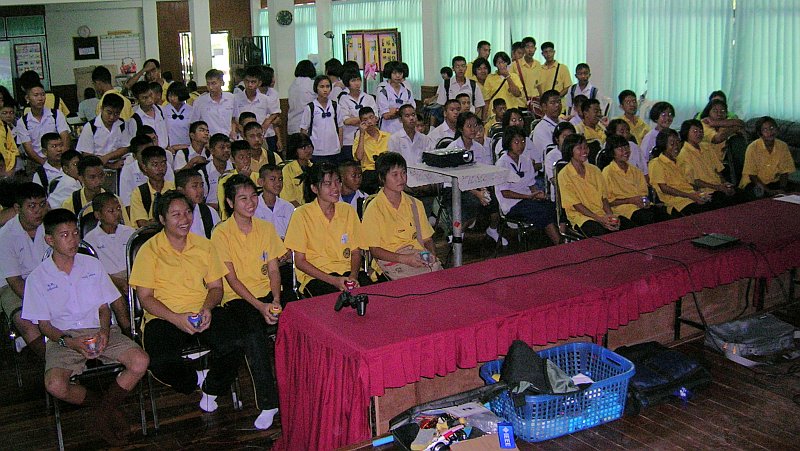
Here are some photos of the system in action
at Dara Academy, Chom Tong school
and the Agape Home for
babies with HIV/AIDS.
You may also be interested in reading about my Bug-zapper Guitar Hero controller or some of my other projects: