
Thomas Tilley
[ Home ] [ Publications ] [ Resume ] [ Family ] [ Projects ] [ The Others ] [ Sitemap ]
[ Home ] [ Publications ] [ Resume ] [ Family ] [ Projects ] [ The Others ] [ Sitemap ]
 | |
 | |
 | |
 | |
 | |
 | |
 |
 Just before Christmas (the night before?) 2006 my sister in-law asked me what I might like for a present. I requested a DualShock-like controller and Guitar Hero II for the Playstation 2 so that I could build my own Guitar Hero controller.
After Christmas day I spent some time looking around for a toy guitar that I could hack but didn't see anything suitable. I then remembered that during my childhood I would sometimes leap about the lounge room with the stereo turned up while pretending to play guitar with a tennis racket.
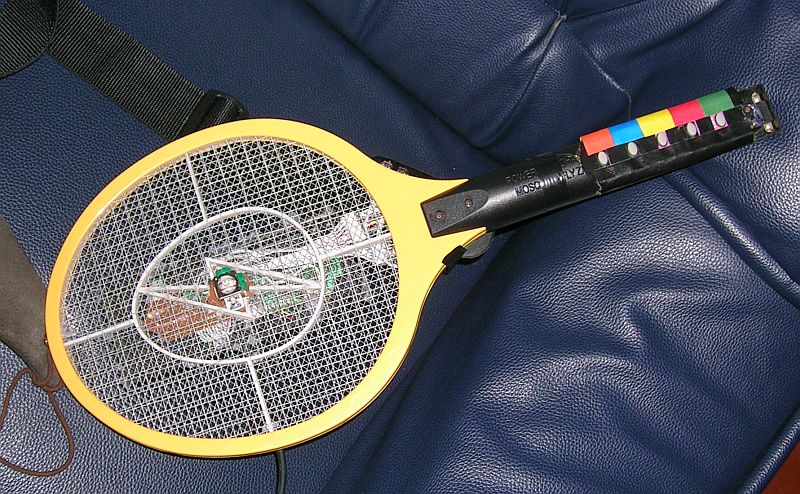
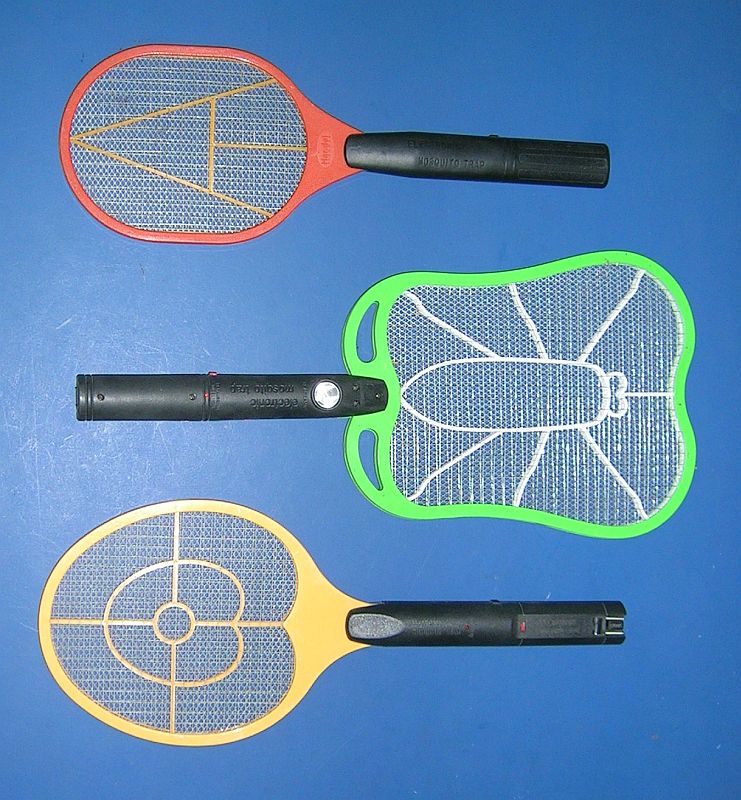
Now in Thailand they not only have tennis rackets but they also have high-voltage bug-zappers that look like tennis rackets. They are great for chasing down potentially life threatening mosquitos (using one is clearly a case of self denfence) which disappear in a bright blue flash accompanied by a satisfyingly loud bang. While swinging the "racket" through the air you hold down a button on the handle which energises the mesh and a small red LED lights up to let you know that your holding something very dangerous in your hands (see the red-arrows on the image below).

You can now find a huge variety of DIY Guitar Hero controllers on
the net made
from LEGO, real
guitars,
and erector
sets and even Guitar Hero
playing robots.
Given my fond childhood memories, the tennis-racket-esque (and
therefore guitar-like) shape of the bug-zappers, their ready
availability and low cost I decide to use a bug-zapper for the body
of my Guitar Hero controller.
I purchased a racket with a groovy lightning-bolt motif and started by gutting the handle and removing the existing electronics. Despite being powered by only two 'AA' batteries it delivers a surprisingly large kick - although at a very low current.
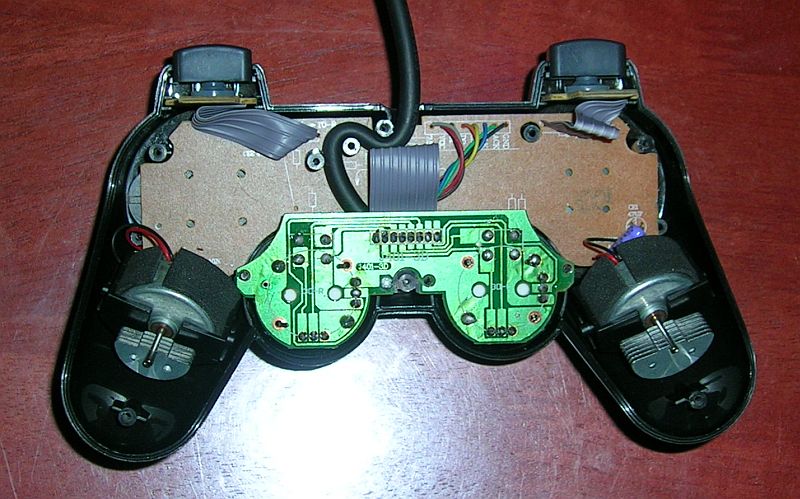
I also removed the circuit board from the DualShock controller and
de-soldered the rumble motors and Right analogue joystick. The printed circuit
board (PCB) has what appear to be small test-pads located near each of the
buttons and I soldered wires for my guitar directly onto these pads
using the mapping in the table below.

| DualShock | Guitar Hero Controller |
|---|---|
| L2 Button | Green Button |
| L1 Button | Red Button |
| R1 Button | Yellow Button |
| R2 Button | Blue Button |
| ( X ) Button | Orange Button |
| Start Button | Select Button |
| ( /\ ) Button | Back Button |
| Select Button | Star Power |
| Left Joystick | Whammy Bar + Up/Down |
(Some time after my guitar was completed I found out that shorting the Left D-pad button makes the game think that you are using a Guitar controller. The Up and Down D-pad buttons can then be used to strum.)
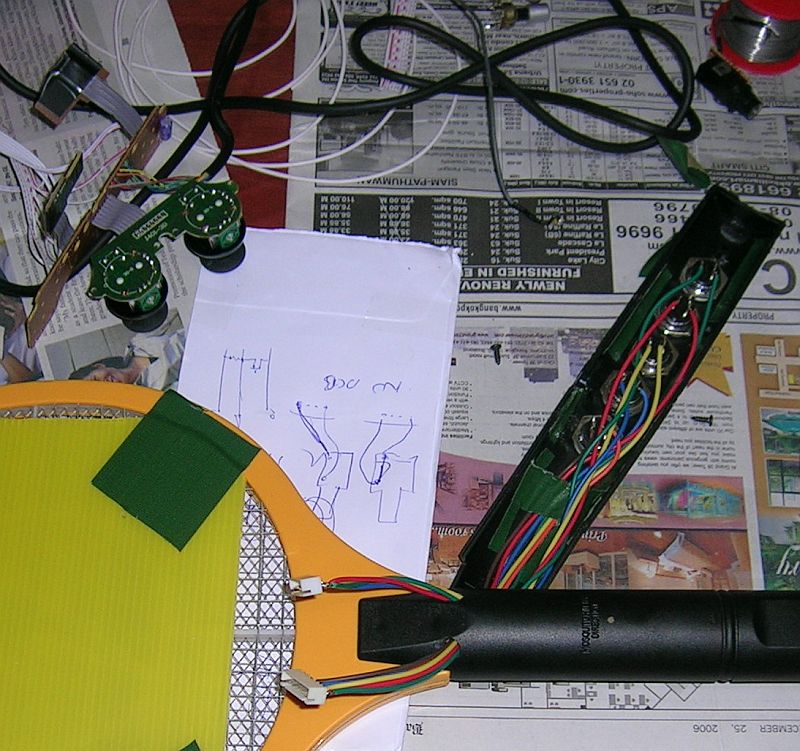
The fretboard buttons were connected to the DualShock PCB using
some multi-pin connectors and wiring from a faulty DVD player (I like
to keep a few broken things around for just such an emergency). I
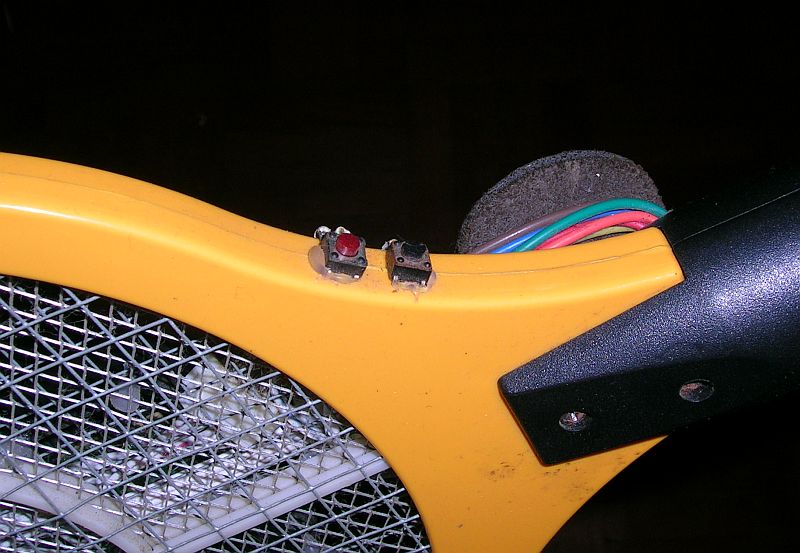
used two small tact switches for "select" and "back" and these were mounted
using hot-melt glue at the base of the guitar's neck.
Using some side-cutters I carefully cut through the mosquito-frying mesh to make a hole just large enough for the left joystick and hot-melt glued the board in place. Then by trimming the mushroom off the top of the thumb stick and carefully cutting a vertical slot I was able to mount a plectrum in the top of the joystick. A small screw through the shaft held the plectrum in place. It was a novel touch but a little confusing because the joystick acts as the whammy bar when you play Guitar Hero with a DualShock controller!
The rest of the DualShock PCB was housed in one-half of a project box which was also glued to the back of the mesh. A cable tie secured the controller lead to help prevent any stress on the connections during wild guitar solos and I added two guitar strap buttons (real buttons for attaching a guitar strap - not push buttons in this case) at the back of the neck and the top of the "racket head".
The guitar was nearly ready to rock but we still needed a
rockstar-like way to activate star power. Having to push a button
just wouldn't cut it.


|
|
| Martin Riggs is examining a twisted hunk of metal as Murtaugh walks up beside him. | |
| MURTAUGH: | What'cha got? |
| RIGGS: | Part of the device. (beat) Holy cow. |
| MURTAUGH: | What? |
| RIGGS: | Artwork. This is @!#%$ artwork. |
| MURTAUGH: | Swell. I'm glad you liked it. |
| RIGGS: | You don't understand. This is real pro stuff. Haven't seen this since... well, since the war. |
| MURTAUGH: | Come again? |
| RIGGS: | C.I.A. used to hire mercs who used this same setup. Mercury switches. |
That's right folks - mercury switches. I wanted to be a
professional and I also needed some sort of tilt switch in the guitar
to activite star power so I went looking for a mercury switch. Having
only been in the country for about six months at that stage my Thai
wasn't very good. At the local electronics store I spent some time
trying to explain what I was looking for and after many drawings of
thermometers and attempts to look like Mel Gibson they told me that
they didn't have any mercury switches. Feeling somewhat disappointed
I thanked them for their time but as I turned to leave the store I saw
this:
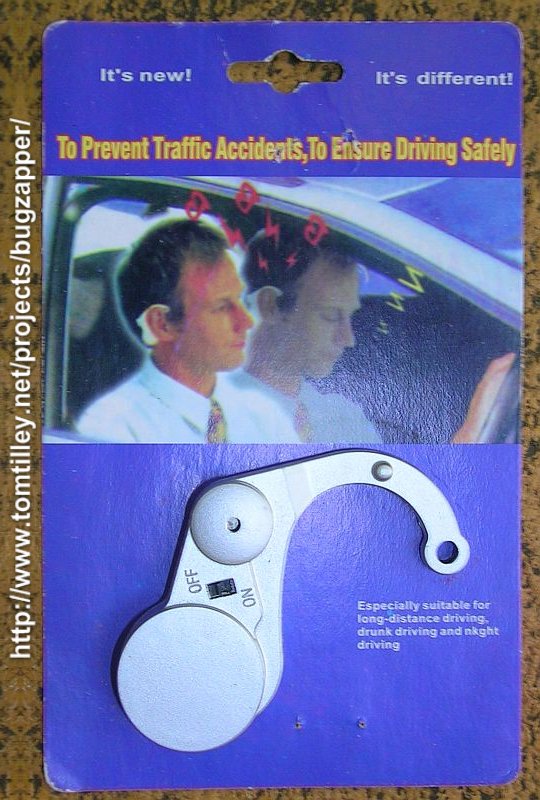
It's a small device that you fit over your ear while driving.
Should your head fall forward it then emits an ear piercing beep that
causes you to wake up while simultaneously deafening
you. The blurb on the front says that this hearing destruction
machine is "Especially suitable for long-distance driving, drunk
driving and nkght [night] driving" and the back of the packaging
refers to it as the "Cure Sleepiness Right Away" which I think is a
very catchy name. There was obviously some sort of tilt-sensing
mechanism inside and sure enough when I opened the case what I saw was
artwork - there was a mercury switch inside. Now we were ready to rock.
The blurb on the front says that this hearing destruction
machine is "Especially suitable for long-distance driving, drunk
driving and nkght [night] driving" and the back of the packaging
refers to it as the "Cure Sleepiness Right Away" which I think is a
very catchy name. There was obviously some sort of tilt-sensing
mechanism inside and sure enough when I opened the case what I saw was
artwork - there was a mercury switch inside. Now we were ready to rock.

At first my son was a little reluctant to try the guitar because he
was afraid of being zapped. Hmm... perhaps I should have left the
high-voltage electronics intact and the guitar could be used
for operant
conditioning. If B.B. King's guitar is
called "Lucille"
then an appropriate nickname for this guitar might be "Frank",
"Dweezil" or perhaps even "Moon Unit".
Three Generations of Buttons
While making the guitar I was surprised at how difficult it was to find appropriate buttons - in fact the guitar has now been through three different generations of buttons.
I found these beautiful looking buttons at the same electronics
store that sold the succinctly named "Cure Sleepiness Right Away" and
thought they would be perfect for this hack. They were sold in pairs,
were of a reasonable size, and came in a range of fashion colours
which just about covered the Guitar Hero rainbow - except for orange.
I bought a pair of white buttons which I planned to paint orange.
Unfortunately these buttons were very unreliable - even if you applied
finger-straining levels of pressure - which made for a very
unsatisfying and frustrating Guitar Hero experience. Hence the mark
II version...
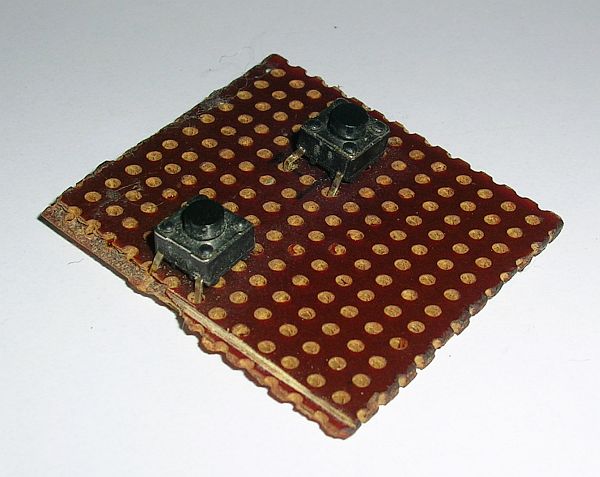
These were some tact switches - scavenged from the control panel of the DVD player that also provided the wiring looms and connectors - which I mounted on some prototype board. They worked reliably but unfortunately were quite small - which was fine for the "Select" and "Back" buttons but not for the actual fretboard.
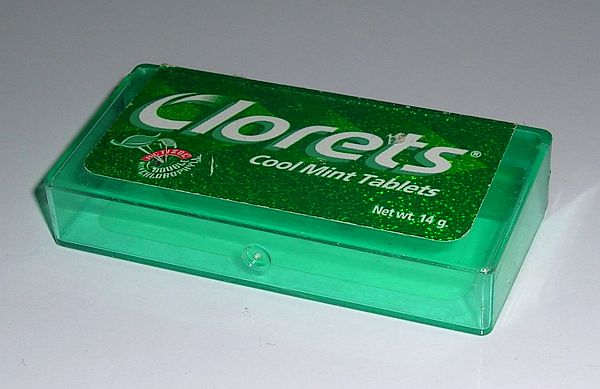
To increase the surface are of the buttons I cut the bases off some plastic Clorets containers and duct-taped them in place over the buttons. Again I though about using different colours for each of the buttons but they only come in three or so flavours and so I stuck with "cool mint" green.
The buttons worked surprisingly well but after a lot of play (over a
period of days) the tape would slip and you would again experience the
frustration of pressing a key in the middle of a screaming solo only
to miss the note through no fault of your own. Actually I guess it
was my fault because that's how I'd made the guitar - hence the mark
III version...

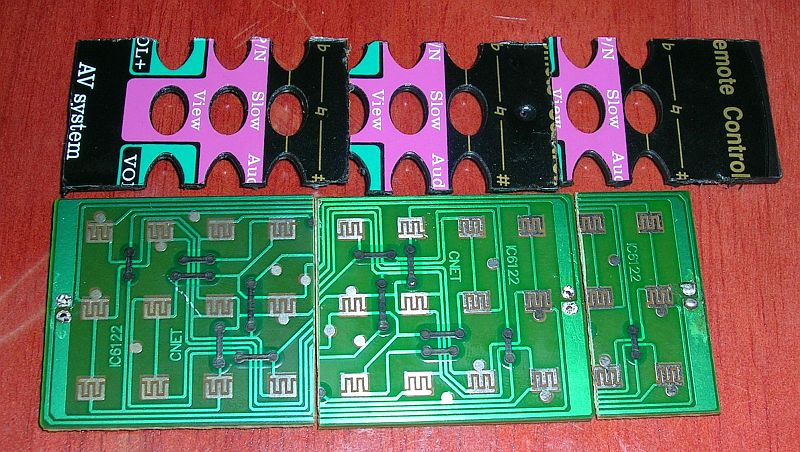
At what was fast becoming my favourite electronics store (there aren't actually that many to choose form here) I found three TV remote controls for a total of $1. The buttons weren't as large as I would like but the spacing of every second button was the right distance for the note buttons on my guitar's fretboard. It also turned out that the PCBs in the remotes were the same width as the neck of my guitar - although no single board was going to be long enough for all five buttons.
In the end I used pieces of all three boards and simply cut off the
surplus buttons. Some hot-melt glue secured the three seperate
button boards onto a supporting piece of plastic and once wired, the
assembly was attached to the neck using more hot-melt glue and duct
tape. Smaller coloured pieces of tape were added to indicate the
button colours.
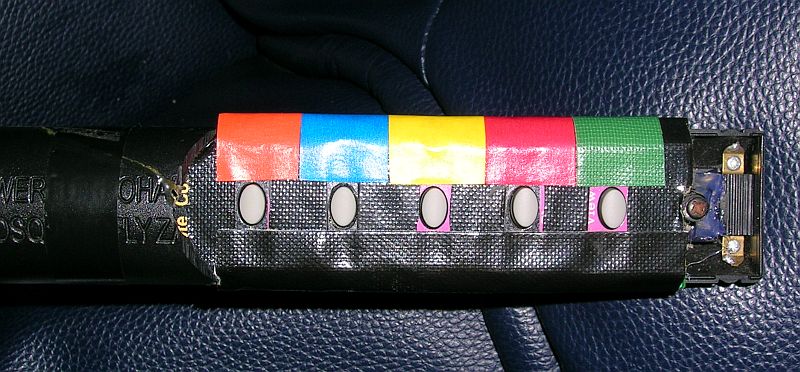
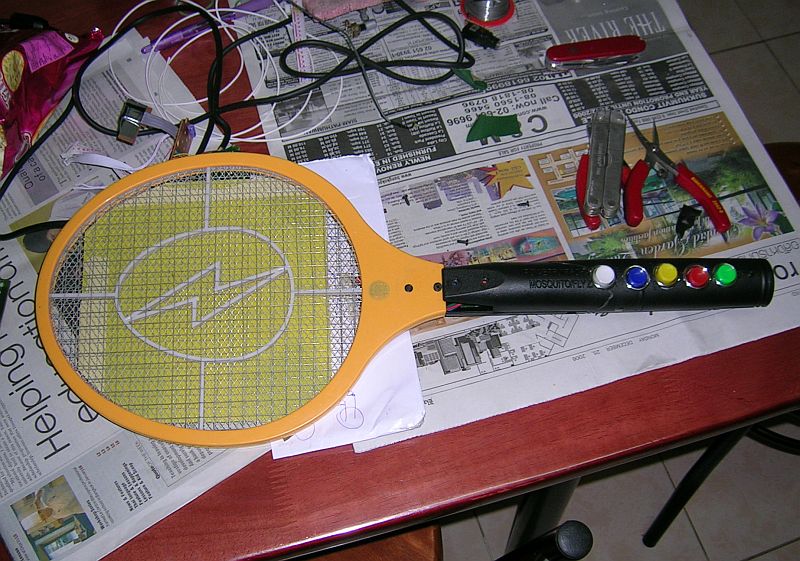
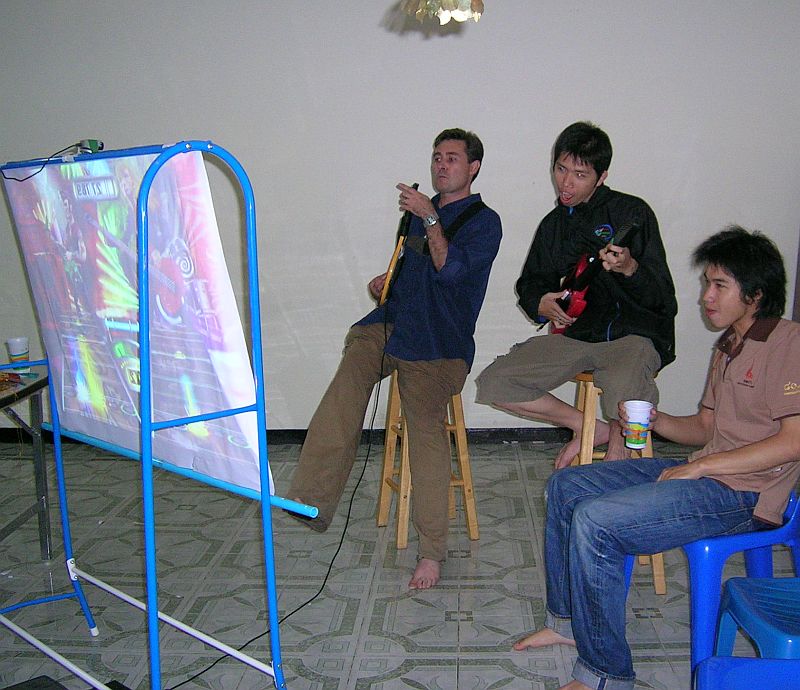
Although the mark III buttons are small they work very well. Here
are some pictures of the guitar in action with some Thai university
students rocking out when the original plectrum whammy bar was still
attached (left) and at our 2007 Christmas party (right). The rear
projection screen in the right hand side image is a clothes stand (the
blue arches) with some paper draped over it and a length of the
ubiquitous blue PVC water-pipe for some weight. The screen also works
well for playing Eye-Toy and you
can see the camera taped into the top of the screen. Rock on!

You may also be interested in reading about my multiplayer Guitar Hero hack or some of my other projects: